Prepare to be enchanted by the magic of the Larch (Larix) in this captivating video presented by our resident expert, Lloyd Noall. With nearly half a century of growth behind it, this 45-46 year old Larch bonsai is a testament to the skill of the artist. Lloyd introduces us to the unique charm of the Larch, a deciduous conifer that offers a year-round spectacle. “It’s a truly magical tree,” Lloyd explains, guiding us through its seasonal transformations.
From the bright lime green of spring buds to the golden glow of autumn foliage. As Lloyd begins to work on this mature specimen, he shares invaluable insights into the Larch’s qualities as a bonsai subject. Its adaptability to pruning and ease of cultivation make it an exceptional choice for bonsai artists of all levels. Join us as Lloyd demonstrates the delicate process of cleaning, shaping, and styling.
Larch/Larix Bonsai Species
The larch tree (genus Larix) is a deciduous conifer known for its graceful, striking appearance. Its slender, pyramidal shape is adorned with soft, feathery needles that emerge in a vibrant, fresh green during spring. These needles grow in clusters on short spur branches, creating a lush, textured look. In autumn, the larch transforms into a golden spectacle. Its needles turn bright yellow before falling. Leaving behind its distinctive, reddish-brown bark that becomes deeply furrowed with age. Towering upright, the larch is both elegant and rugged, standing out in any landscape with its seasonal charm and unique blend of conifer and deciduous traits.
The Larch (Larix) is a remarkable tree that stands out among conifers, making it an exceptional choice for bonsai enthusiasts. Unlike most evergreen conifers, the Larch is deciduous, shedding its needles in winter. This unique characteristic allows bonsai artists to appreciate the tree’s seasonal transformations throughout the year. One of the Larch’s most striking features is its vibrant spring growth.
As Lloyd Noall describes, “These little florets open up from these buds and they really are this bright lime green and it just starts to take over the whole tree as the buds open up it gets more and more green.” This spectacular display is further enhanced by morning dew, creating a mesmerising effect as sunlight catches the water droplets. The Larch’s seasonal changes continue with darker green foliage in summer, followed by a “beautiful golden glowing colour” in autumn before the needles drop for winter.
This cycle of transformation makes the Larch a “truly magical tree” for bonsai cultivation. Another attribute that makes the Larch ideal for bonsai is its tolerance for pruning. Unlike many evergreen conifers that require gentle pruning, the Larch can be pruned more aggressively, especially during winter. This flexibility allows for easier shaping and styling, giving bonsai artists greater creative freedom. The Larch also boasts attractive bark with “lots of little fissures and cracks and nooks and crannies,”. Thereby, adding to its visual appeal even when bare in winter. This textural interest contributes to the tree’s year-round beauty as a bonsai specimen.
Transcription of this Video – Part 1
Larch trees make fantastic Bonsai. Why? Well let’s find out.
Of course one of the really unusual things about Larch, is that it is a conifer.
So it’s part of the cone bearing family of trees. Like Pines for instance, but what’s unusual is that it is actually deciduous so it loses its leaves through the winter time. Whereas most conifers are evergreen. There are only a few conifers that actually do this and the Larch is obviously one of them. And being deciduous, that of course means that we get to appreciate all the different seasons that it goes through. So here we are in winter mode and it won’t be long before we start to get the spring growth and the Larch has the most amazing spring growth.
The Larch is an Unusual Species of Bonsai Tree – A Deciduous Evergreen
Little florets open up from these buds and they really are this bright lime green and it just starts to take over the whole tree as the buds open up it gets more and more green. They are beautiful. And the other thing I like about these the Larch is the leaf clusters, or florets. In the cool of the morning you get the dew or you get a little bit of rain. You end up with little globules of water right in the centre of those leaves. It sort of forms this little ball here of water and when you get the morning sun on it.
Oh, and it looks fantastic, like lots of little lights shining all over it beautiful trees. Then obviously they go darker green through the summer. It gets covered in this lovely emerald green foliage. All the twigs kind of disappear but you end up with nice foliage pads. In autumn time you get this beautiful golden glowing colour. This happens before all the leaves drop off and we’re back to where we are now. So it’s a truly magical tree and the other thing of course is it’s actually really easy to grow.
The Larch Bonsai Tree is Easy to Grow
It doesn’t mind being pruned, so we can shape it by pruning quite easily. This is also unusual for conifers because being an evergreen tree like Pines and junipers, we can only prune a little bit at a time. But the Larch being deciduous, we can prune it fairly hard through the winter time which is great for shaping purposes and styling purposes and that’s what we’re going to be doing now. We’re going to be doing some shaping and a bit of styling on this bonsai.
It’s around about the 45 / 46 ish years. It’s one I’ve grown for a long time but it’s still got a lot of work to do. I still need to do some shaping, some branches to change and things like that. So we’re going to have a look at that in this video and while we’re going through that, we’ll look at some other attributes of the Larch.
Clean the Larch Bonsai Tree before we get started
First things first I’m going to have a cleanup around here, we’ve got lots of moss. Also it’s a little bit weedy, there are some old needles and so we’re going to clean up through that. It’s a great process. I love this cleaning bit because it kind of gets me in tune with the tree before I start any taking off or changing any branches and doing any styling work. It really brings me together with the tree.
Let’s get on with that.
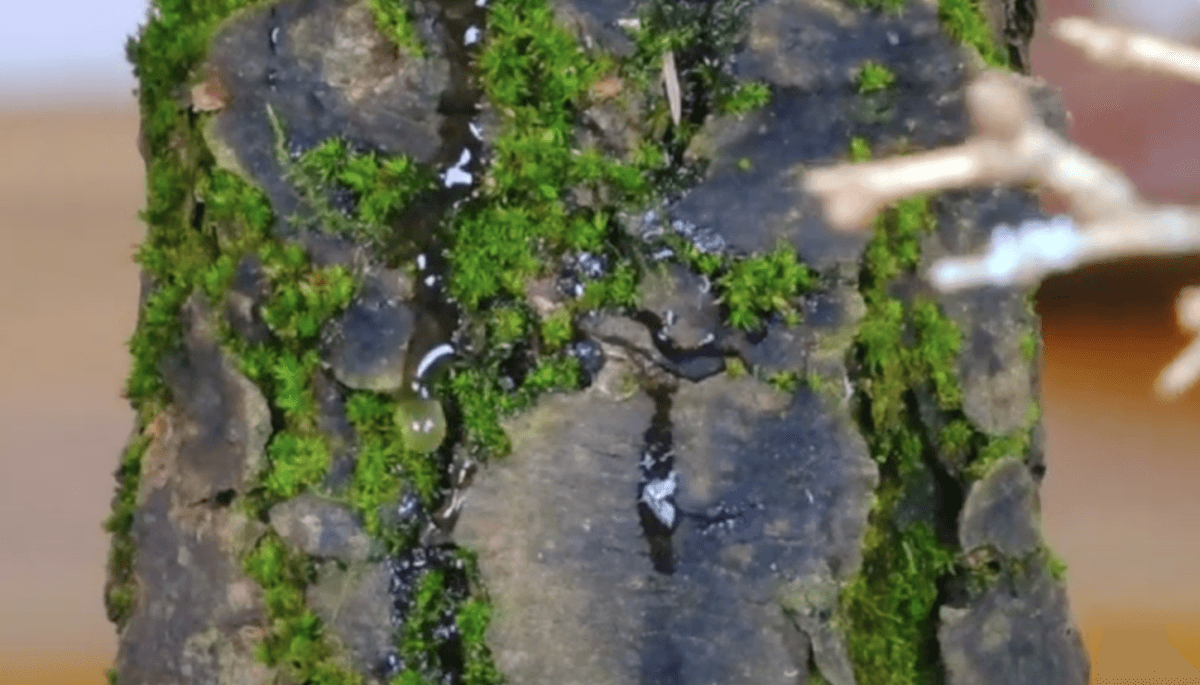
We’ve got moss which is actually creeping all the way up the trunk. This is lovely because lots of old trees, especially Larch, they do have moss growing kind of all over them. We’ve got moss on the branches up here and it’s lovely.
I also like to make sure that I can see the bark, the cragginess of the bark and Larch has really lovely bark. It has a lovely colour to it, lots of little fissures and cracks and nooks and crannies so we need to make sure we can see that character. So maybe I’ll keep a little bit of the moss and blend it in a little bit because I like both. We’ll see how we get on.
Considering the Shapes of this Larch Bonsai Tree
So this is great, we can see everything that’s going on down here. There’s still a lot more cleaning up to do, but we can see basically what’s going on. It’s not the most beautiful and elegant start of the bonsai, but it is very interesting. There’s lots of shapes going on down here that we can work with going forward. Lots of things I need to sort out, which we’ll do in the repotting video. That will be the next one so if you want to see that, please subscribe. We’ve got these things to sort out, and lots of things we can improve upon, so that’s good. For now, we are going to concentrate on the actual top of the bonsai. I love the overall shape, it’s just really simple shape and it looks lovely all year round.
The trunk, I really love this trunk it’s just simple and it’s straight, it’s uncluttered. Furthermore, it is very easy to see; very easy on the eye. The bark is lovely, it gives some interest but when we get to this point sort of midway up here the trunk becomes cluttered and that spoils it because it’s lovely. It’s lovely all the way up so we need to be able to see that. This has been happening for a while.
Originally I Allowed this Larch Bonsai Tree to Grow & Thicken
When the tree was younger, I left more branches in to fill out the space to get this kind of overall shape. As time goes by and the branches thicken up and they get bigger they get more twiggy, it occupies more space. Then it gets to a point where we don’t really need two branches to occupy this space we can do it with one. That starts to simplify the trunk because if we think I can take out a branch now and leave one nicer branch, we can see that branch, we can see the trunk.
It leads me onto a phrase which I live by. There’s three simple words “less is more” and it just echoes around in my head quite often. Not just with bonsai, but with everyday things and in this situation less is more.
So the less branches we have, the more space we have, the more opportunities we have to see the trunk and to see those branches. If we then have more space we can grow this branch, for instance, here it could occupy more space. It becomes more twiggy, then because it’s more twiggy we get more foliage going onto it so there’s less in here but more out here I suppose is what I’m trying to say. It’s the same all over so we can then gradually thin out some of the branches and then let the bigger ones, the nicer ones, the ones that are better placed around the trunk to take over, that simplifies the bonsai.
‘Less is More’ when growing bonsai
But how do we do that? How do we know which ones to take out? And there are a few obvious things, but it’s also a process you don’t have to do it all in one go. I have seen that some of these branches have needed to come out over the past two or three years. As one branch gradually gets a bit bigger, we can use that one to take over and we can take out the ones near it. We need to make sure that we keep some branches on the sides to give us some side branches.
Try to ensure that you have some background and we need some foreground and what we don’t need is to occupy this space right in the viewing part here. We need to make sure we keep that clear, because we want to be able to see the trunk.
It’s good to have a little bit of movement, a little bit of twiggyness maybe just creeping out into the foreground, just to keep it natural. I don’t like to see a bonsai where it’s kind of branches all the way around, and then it’s just like this wedge shape cut out the middle so that we can see the tree so I try to keep it natural. I try to keep the branches just maybe creeping in a little bit. Anyway, let’s move forward and think about how we can declutter this part of the tree.
There are a couple of obvious things and it’s very hard I think for you to see but I will try to help you. I’m going to just say that this branch here, this is my primary branch although it’s not low but at the moment is thick and it’s just lovely so I’m going to say that that’s a really important branch.
Study the shapes & details before you start work
I love this little curve under here and when I come and do some close-ups you can see that.
So although this is my first branch, it’s not quite thick enough yet. We’ve got this one above it and if you can see that there and this one here.
There’s a problem. We’ve got what I call like a crossing branch like a bar branch. Two opposing branches that start from the same place and they’re doing this. You can’t see it at the moment because it’s kind of camouflaged by all the other branches but what it does is as you’re looking up the trunk. Look at my lovely trunk, coming up here, get to this point here and we’ve got this going on which is these two branches here. I might be able to lift that one up maybe a little bit, you might be able to see this one and this one. If I turn it around a little bit and what that does it’s a kind of like a psychological barrier.
As you’re moving up the trunk, as you’re looking up here, all of a sudden you’ve got two branches sticking out doing this. Which it’s not the end of the world but it doesn’t look quite nice, it’s nice to have them kind of staggered a little bit you know. So we’ve got a little bit of a problem going on there, it will only get worse. So if I was to leave it, as these two branches get even thicker imagine them being twice as thick. It then becomes more of an obstacle in this zone so we got to sort it out somehow.
It’s nice to have them offset and in nature and I think what we’ve got to try and remember is that most things in nature are not symmetrical as well. They’re kind of off-balance a little bit, our faces, and things like that so we try to avoid things being opposite and even.
Try to Stagger Branches so they don’t ‘cut through’ the design
It’s not always possible, sometimes you have to live with things it’s a compromise sometimes. But we are quite lucky in this way that we have this branch here which actually has got a lovely shape to it. I’ll turn it around a little bit. So just concentrate on this here got this nice little twig going down there so we could put quite a nice shape in there. It’s not very thick at the moment but in time it will grow and it will thicken up.
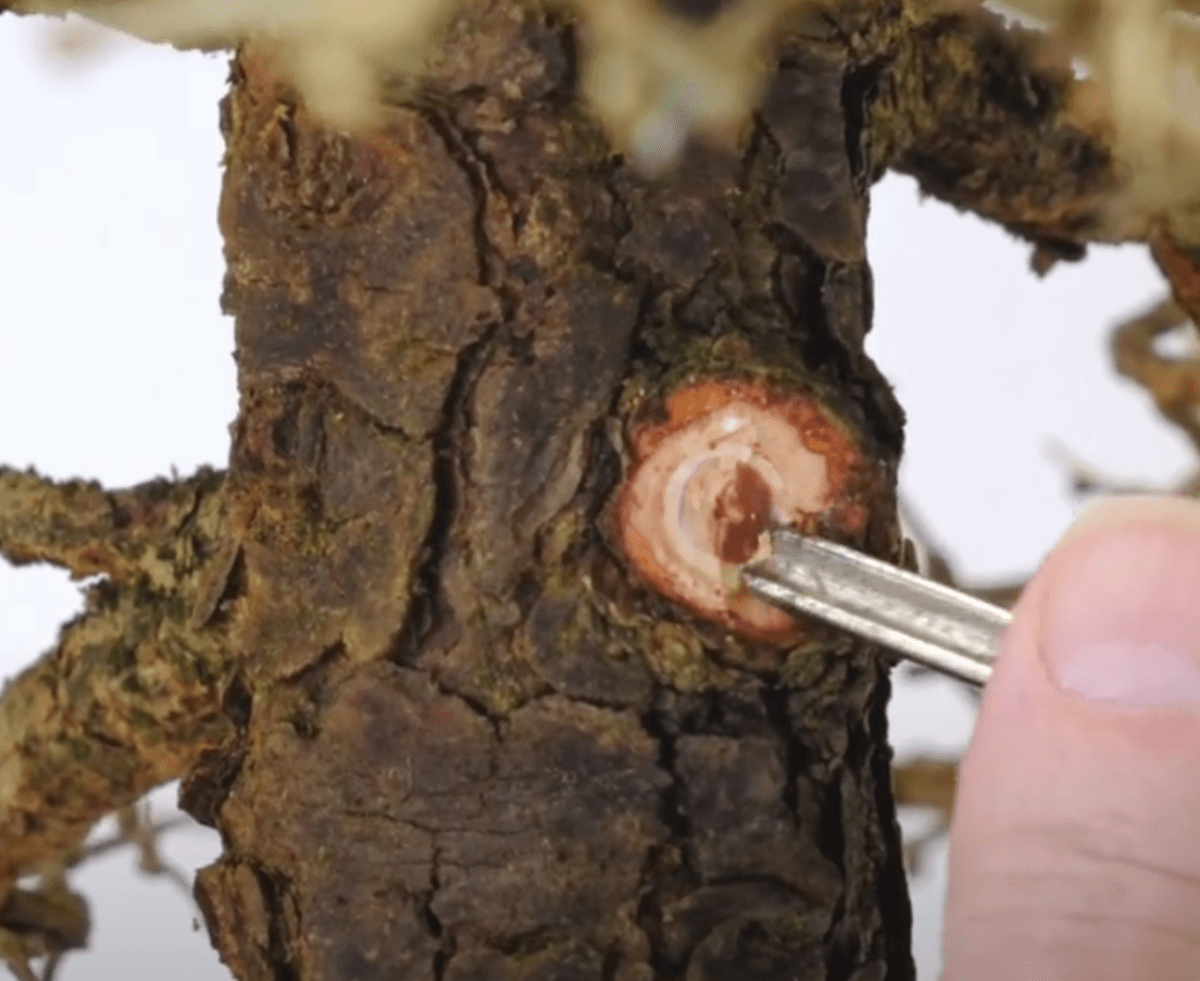
We actually getting to the point where we can take out this branch and that’s great so we’re going to do that. We’re going to take this branch out chop it off and there are a couple of other branches that are similar and this is the other one here.
This one is nice and thick now, it’s got some lovely twigs it needs a bit of refinement, got some crisscrossing twigs in there but we’re going to go through and just trim that all out. For now, I know that I need to remove, and I’ve been looking at this for a long time it’s not something that I’ve just decided I think I going to do that. So over the years, I can kind of see yeah I’m going to have to take out one of those. Now’s the time because this one’s going to be a little bit light, a little bit twiggy.
So there will be a little bit of space here but we’ve got one behind, we’ve got one above it, not a problem. Great. I love the start of this branch here, it’s lovely really nice I’ll give you a closeup. I’ll come in later and do the closey uppy thingy, so for now let’s stop talking let’s get on and have some action.
Space is important in your bonsai design
Okay. So I know there now is a big space here but that will gradually fill out but here it’s a lot more simple and we can see a lot more of what’s going on here so that’s looking good. So on to the next one!
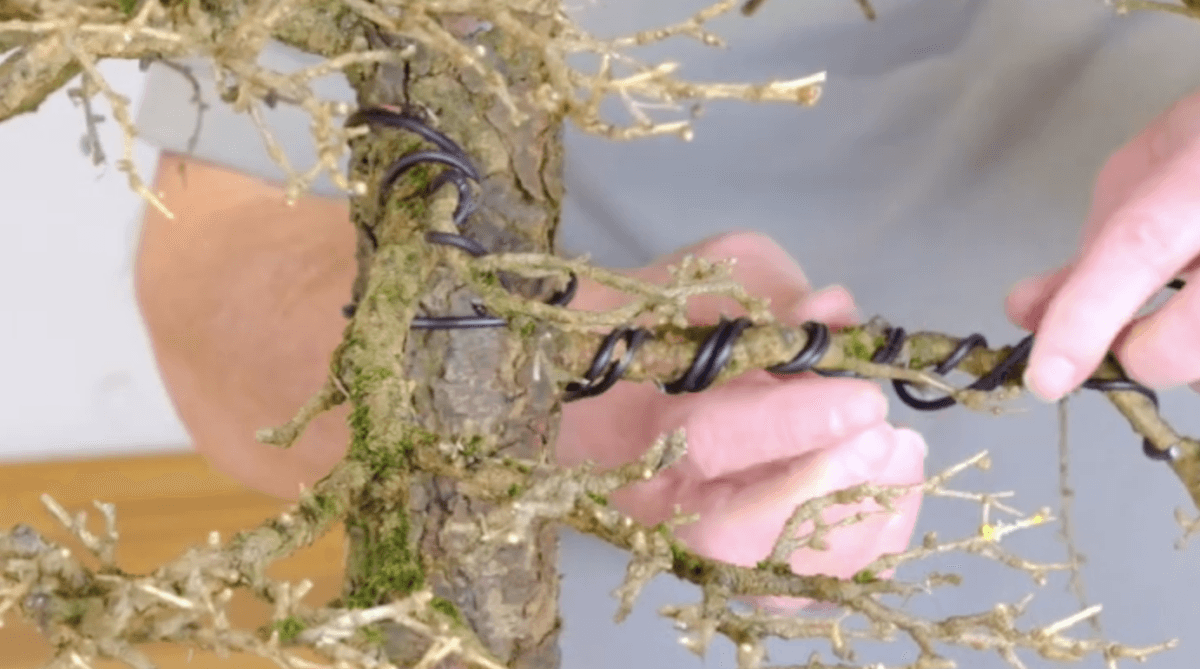
With both branches gone, it kind of equals up the space. When I first took this one off it looked very gappy here but gradually as we add more space it evens it up a little bit. The trunk is very clear, we can see both branches much better and as this one grows, thickens up and really comes out. Let’s see if we can maybe do a bit of mock up. Sometimes this works, sometimes it just sort of complicates it a bit more. But maybe, I can blend it in and unhook it a little bit.
You know, maybe something like that. I don’t know what that looks like but you kind of get the idea. So this will thicken up, branch out there. This one’s lovely, we can see all this around here really pleased with that. Little bit of tweaking here and there but that’s good and the trunk looks lovely.
Part 2 & Part 3 of this Larch Bonsai Tree Transformation to Follow ….
Well, I’m going to leave it there for this video. I had thought that it would only be two parts but there’s got a lot more to it than I first thought so we’re going to make it into three parts. So make sure you don’t miss part two and part three, hit the subscribey button and all those bits and pieces to make sure that you don’t miss out. I’m enjoying it, so I’m looking forward to doing the next couple of bits. So for now, Take care.
Larch Bonsai Tree Styling: A Master Class in Branch Refinement PART 2
In our latest blog post, bonsai expert Lloyd Noall takes us deep into the art of restyling a mature 45-year-old Larch bonsai. Part 2 of this captivating series reveals the intricate process of branch selection, pruning, and shaping.
What You’ll Discover
- Lloyd’s expert approach to decluttering bonsai branches
- The philosophy of “less is more” in bonsai styling
- Techniques for revealing the tree’s natural beauty
- Insights into working with a mature Larch bonsai


0 replies