Welcome to another expert guide from Bonsai Direct! Today, we’re diving into part two of a captivating bonsai journey with our resident expert, Lloyd Noall. With nearly 40 years of professional bonsai growing experience, Lloyd brings a wealth of knowledge and hands-on expertise to help bonsai enthusiasts refine their skills. In this video, “Styling and Wiring Larch Bonsai Trees,” Lloyd demonstrates the art of restyling and repotting a beautiful Larch bonsai tree. From thinning out branches and decluttering the structure to wiring and shaping, he shares invaluable insights into creating a harmonious and uncluttered design. With Lloyd’s practical advice, you’ll learn how to enhance the natural beauty of your bonsai while preserving its unique character.
Let’s explore how Lloyd transforms this Larch bonsai into a masterpiece, one branch at a time.
How to Wire a Bonsai Tree Branch: A Step-by-Step Guide
Wiring is an essential technique in bonsai care, enabling you to shape and style your tree. Properly wiring a bonsai branch ensures healthy growth and minimizes the risk of damage. Here’s a clear and concise guide to wiring branches effectively, with important considerations for success.
1. Use Proper Bonsai Wire
- Choose Quality Materials: Use aluminium bonsai wire. Aluminium is perfect for beginners due to its ease of use and pliable nature.
- Rust-Free and Flexible: High-quality aluminium bonsai wire doesn’t rust and is easy to bend using your fingers and thumbs, making it ideal for precise work.
- Wire Thickness Matters: Bonsai wire comes in various thicknesses, typically ranging from 1 mm to 5 mm. Select a wire thickness that is appropriate to support the size and diameter of the branch or trunk you are working on. For thinner, younger branches, use finer wire. For thicker branches, use heavier wire for adequate support.
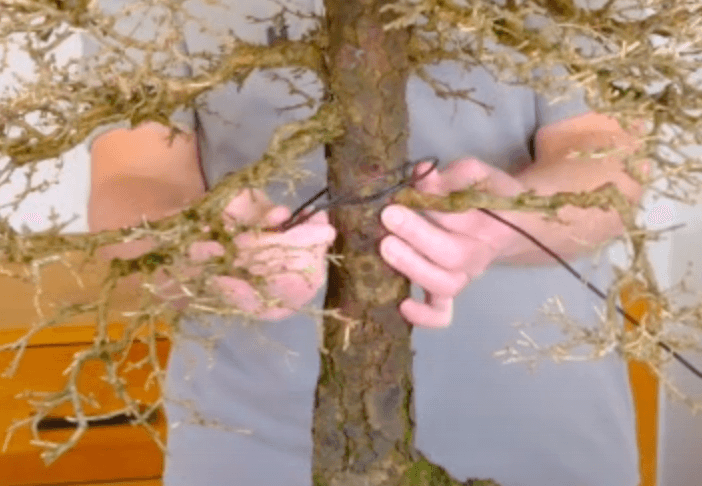
2. Anchor the Wire Properly
- Why Anchoring Is Crucial: Anchoring provides a stable foundation for wiring. Without a proper anchor, the wire will loosen as you shape the branch, reducing its effectiveness.
- How to Anchor:
- For individual branches, wrap the wire securely around the trunk or another branch close to the one you’re shaping.
- Ensure the anchor point is stable but not so tight that it damages the bark or cuts into the tree.
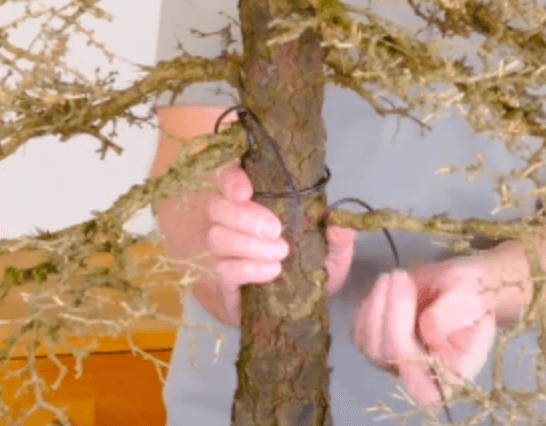
3. Apply the Wire Correctly
- Place, Don’t Wrap: The wire should rest on the branch rather than being pulled tightly around it. If the wire is overly tight, it can constrict growth or damage the bark, particularly at the starting point where the wire is anchored.
- Spiral Wrapping: Wrap the wire at a 45-degree angle along the branch, ensuring even support. Avoid overlapping or crossing wires, as this can create unnecessary pressure points.
- Control Tension: Maintain consistent tension throughout the process. Don’t over-tighten, especially at the start, as this can cause the wire to dig into the bark.
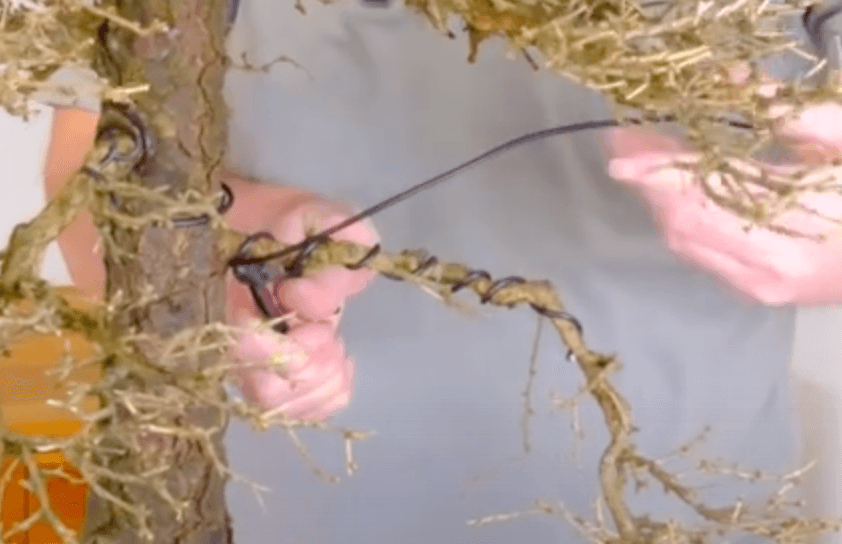
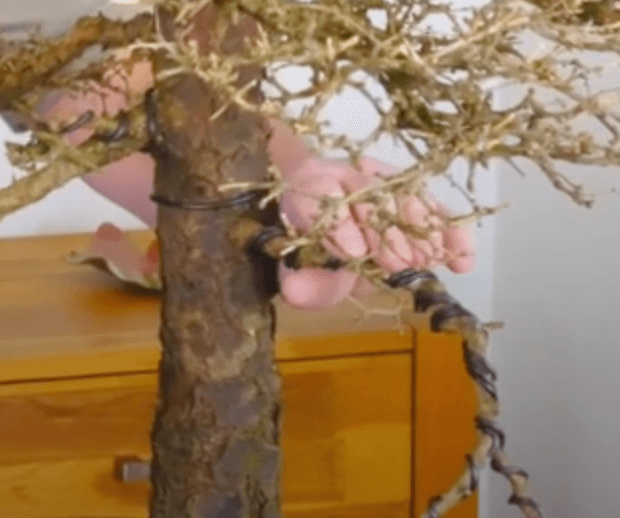
4. Shaping the Branch
- Bend Slowly and Gently: Once the wire is in place, bend the branch gradually into the desired position. Use steady pressure and avoid sharp or abrupt movements, which can snap or damage the branch.
- Work with the Tree’s Natural Form: Follow the natural flow of the branch for a more organic and aesthetically pleasing result.
5. Monitor the Wire Regularly
- Check During the Growing Season: As the branch thickens during the growing season, the wire can become too tight and start cutting into the bark. This can damage the tree and leave unsightly scars.
- Remove Wire Promptly: Inspect your bonsai regularly, and if the wire starts to tighten, carefully remove it using blunt-ended wire cutters to avoid damaging the bark.
6. Reapply if Necessary
- Repeat the Process: If the branch hasn’t set into the desired position after removing the wire, simply repeat the process. Use a new piece of wire, anchor it properly, and shape the branch again.
- Time to Set: Depending on the species and growth rate, branches can take weeks or months to hold their new position. Be patient and adjust as needed.
Additional Tips for Effective Wiring
- Work in Sections: Start wiring the lower branches first and work upward. This ensures a balanced and structured approach.
- Avoid Wiring New Growth: Young, tender shoots are more likely to break or be damaged. Wait until they’ve matured slightly before wiring.
- Protect Delicate Bark: For species with thin or easily damaged bark, consider placing a protective layer between the wire and the branch.
- Don’t wire all species of bonsai: I personally would not wire maples, oak trees or Beech. These deciduous bonsai species prune to shape so nicely that wiring is not necessary. They have very soft bark and wiring them could do more harm than good.
- Don’t Overdo It: Only wire branches that need shaping. Over-wiring can stress the tree unnecessarily.
By following these steps and considerations, you’ll master the art of bonsai wiring, helping your tree develop a beautiful, harmonious structure while maintaining its health. Wiring is a skill that improves with practice, so take your time and enjoy the process!
Transcription of this video about Styling & Wiring Larch Bonsai Tree
Welcome back to part two. Restyling and Wiring this beautiful Larch Bonsai.
Take a closer look at the branch structure before we start wiring the larch bonsai tree
There is still quite a lot going on in this area here. There are a lot of branches and there are a couple in there, at least, that will need to come out. I’m not going to do that now. Now I’m going to do some thinning out and a little bit of shaping to allow some of the branches to grow on and take over a bit more space. For now what I’m going to do is work on this branch and this branch. I shall go through tidy them up a little bit, do a little bit of movement, a little bit of shaping. Basically I am quite happy with the overall shape, it just needs a little bit of cleaning out.
To start with I’m looking for any twigs that are growing in the wrong direction. For example twigs which are growing straight up & twigs which are growing across the main branches and twigs which are criss-crossing and touching each other. But also ones which are growing back towards the centre of the tree. Basically I want my branch structure to work its way out away from the trunk and towards the light on the outside. This will give it a much more simple appearance that flows away from the trunk.
This particular twig has a lovely little curve to it but unfortunately it’s in the wrong place. With that one gone, these two twigs now work together really well.
Keep the branch structure simple & clutter free
With all of the crossing twigs removed now, you can see the lovely shape of this branch. The lovely start to this branch. It comes down here and then you have got a lovely split. Lovely shape coming down there. There is still a little bit more tweaking needed. I might put a little bit of wire on later and just sort of space those out a little bit, but generally I think it’s really lovely. This one can come out a little bit. I shall bring it down & get a little bit of space between this one and this one.
Generally though, that’s lovely and that’s just going to keep on getting better and come out a bit more down here. You can now see the kind of thing that I worked towards. Keeping this bit here, nice and clutter-free. The main branches; keeping them nice and clutter free and the twigs coming out around here. I always kind of think that a the branch is a bit like an arm. So, here’s the main branch and here’s all the sub branches and then the twigs grow around that. So, it’s all uncluttered.
A larch bonsai tree responds very well to wiring
The other thing I really love about the Larch is that, not only is it easy to prune to shape, it’s actually very easy to wire to shape as well. A lot of my deciduous Bonsai such as the Maples, Oaks and Beech, Birch and trees like that, I don’t tend to wire to shape. The bark on those sorts of trees is quite easily damaged and is prone to wire scarring. Therefore, we only prune those trees to shape. Whereas the Larch has got this fantastic, really craggy and quite spongy bark. It’s quite flexible, as well. Even when the branches are quite old it’s still quite flexible, so it takes the wiring really well.
Even if I was to damage it slightly by putting the wire on, or scratch it or slightly damage it like that, then because of the texture of the bark that little bit of scarring, as it heals up, will just disappear and actually will add to the feature. Obviously I always avoid that horrible twisty wire scarring on a tree by making sure I take the wire off before it gets damaged. Generally you can prune these trees to shape, the Larch, and wire them as well. I have done these two, now I’m just going to carry on working my way up the next branch and the next branch and the next branch and the next branch and the next Branch next and the next and the next and the next and the next…
This branch here is a really good example of a branch, which at the moment, doesn’t look that pleasing. There’s a lot going on here, but if we can just look beyond.
There’s a nice start, but I love this curve, coming all the way down here.
An overview of my work on wiring this larch bonsai tree
It’s a really good example of not being able to see a really nice branch. There’s a nice structure in there. There is a nice branch coming off to the side. A really nice split, so there’s a nice shape going on in there. I’m going to prune that out and hopefully you’ll see that shape evolve.
Hopefully, now you can see what’s going on in there and as the new shoots start to come out from here and regrow, we can build up a nicer twig structure that really helps to show off this lovely branch. With all the main sort of bottom and middle part, all those branches, they’re thinned out & decluttered. Now I know it looks a lot sparse and a lot more space in here, but what you need to do is just think back. Think back to basics. The trunk now is very clear, all the way up. I’ve trimmed off a little bit here but we have still got this branch coming out to fill out some of the foreground. The trunk is very clear now. The main branches are very easy to see. As I’m looking at them, there are some beautiful shapes and I will go through and do some closeups and show you those shapes.

In time the beautiful foliage pads will thicken up
That’s all looking really lovely. So yes – we’ve lost a lot of this. Up here, I haven’t pruned and it’s still very twiggy and it looks very full and it looks lovely. But, we’ve lost the structure in there. We’re going to get that back in a minute. Down here it’s beautiful. I love the shapes of all these branches and we found them all again and then throughout this coming growing season lots of new shoots will start to come out and start to fill out these spaces and we’ve got to make sure or I’ve got to make sure, that I don’t allow them to clutter up again and make sure that they’re growing in the right direction and gradually we’ll fill up these beautiful pads. But we will still be able to see these beautiful shapes of these branches and these twigs coming down here. Some really lovely shapes.
All we need to do now is to carry on and get the top thinned out and decluttered.
Magic!
As always, there’s still a lot more work to do. Years and years and years, in fact. And that I just love. I look forward to that. For now I think we’re done. Although I can still see that there are a lot more twigs in there that are criss-crossing. Generally, I think they’re pretty good. There are a few little lumps and old stumps which I still need to go in and clean out, so that we’ve got nice clean flowing lines in there. But for now that’s good. That kind of wraps up part two of this video.
The final part of the trilogy covers the potting of this sensational old Larch Bonsai Tree. I hope you have enjoyed this video about Wiring a Larch Bonsai Tree
Part three will be coming out next and that’s where we deal with the roots. Any odd shaped roots, & lumps and bumps that we’ve got going on down here. Teasing out and root pruning and putting back in the pot. Don’t miss that! 🔔♡ ▶️ Hit the Subscribe button and do all the things that you need to do to make sure you don’t miss out. For now, I’m going to enjoy my tea ☕ and looking at this beautiful bonsai. Take care.


0 replies