Welcome to today’s blog, where I’m diving into the transformation of a remarkable Chinese Juniper bonsai tree! Battling a cold and sore throat won’t stop me from sharing this exciting journey with you. 🤧
This bonsai, featuring a stunning Jin and rich history, was originally started by one of my students back in the ’90s. Over the years, it has developed character and charm, and now it’s time to take it to the next level.
In this post, I’ll walk you through the step-by-step process of cleaning up the trunk, revealing its hidden character, and carefully wiring and styling the branches to enhance its natural beauty. Along the way, I’ll share practical tips for transforming less interesting areas into standout features and discuss how to achieve balance and harmony in your bonsai design.
From trunk cleanup to branch placement and even a bit about root health and repotting, there’s plenty to learn and enjoy. Whether you’re a seasoned bonsai enthusiast or just starting out, this transformation highlights how even the most subtle details can breathe new life into a tree.
Transcription of the Video
In this video, I am going to struggle because I’ve got a cold and a sore throat but the show must go on. I will apologise I’ve got a cold, throat’s a bit croaky, but I’ll do my best.
This Chinese juniper bonsai tree here was started by a student of mine in about the ’90s. She was a lovely young lady, and she was doing quite well but she lost interest in this tree.
A Potted History of this Chinese Juniper Bonsai Tree
It wasn’t going according to her plan and so she left it and I took it on. I’ve done some work to it, obviously, over the years. It’s got quite a nice shape now. I think what happened was this bit here was quite straight. It’s changed quite a lot now and I’ll explain how I did that, but this was quite a straight, uninteresting part of the tree and the style or what she was working towards it didn’t kind of fit into that.
Anyway, when she lost interest I took it on and over the years it’s got quite a nice shape to it now. We’ve got some nice styling going on and it needs some tweaking and obviously a bit of wiring and restyling to bring out his full potential. Got a lot going on in the trunk, there’s a lot here a lot of character and texture but it’s all a bit grubby. It needs a good clean up so I’m going to do that first.
Cleaning up the Chinese Juniper Bonsai Tree before we start considering design improvements
Then we can see exactly what’s going on in this area. Before you start to work out where the branches should be and things like that so I’m going to get stuck into that now.
That’s cleaned up the trunk nicely, we can see a lot more of what’s actually going on in here. Now, we’ve obviously got this this Jin here and this shari coming down here. As I said earlier this bit was rather straight originally quite uninteresting and I think that’s why Nikki she lost interest in it. But with time we can add those little features, so what I did was to Jin out the top. This was actually a branch and to add some character and a bit of shape down here. I brought the Jin right the way down. Also, I shari’d it all the way down here with a little bit of a turn on it as well to break up that straightness.
Jin & Shari Features
Now over a period of time, the way the trunk on this Chinese Juniper Bonsai tree has grown is that we have this kind of, you can see it in here, it’s thickened up here. This is the main life, so this is the only bit around here that’s actually living now. So it’s swollen up, this bit all around here is dead. Originally the bark was here but that’s gradually died off and we got this main vein which comes up around here. It’s given this lovely twist, there’s a lot more character to it now. So I like that. This root down here that’s died off, and so has this root.
Bring it around. So this is dead, and down here. I’m not going to worry too much about what’s going on around here. I will clean up some of these. Might be a to use some of them as a little bit of dead wood feature down here. I’m going to have to repot the tree. It was last repotted a couple of years ago, but it’s not terribly stable. Therefore, I think there might be a little bit root going on in there but until we take it out and have a look I’m not quite sure. What we’ll do is we’ll have a look at that later.
Look out for Natural Curves & Promote Their Design
Right now all I’m going to be concerned about is around here, and the next thing I need to do is to sort out this branch. I love this curve, really like that flows down nicely so it’s these ends. In fact most of the branches are quite well placed. They just need tweaking now so we’re going to do that. Going to put some wire, on wire these and we’ll work our way up the top. I don’t need to change the start of this branch, so from here to here that’s good quite happy with that. Down here and over here we need to change that.
So I need to bring a wire, I’m going to start it and anchor it onto this bit here, all the way down so that I can change the shape of this bit. Got a little branch in here. I don’t know whether you can see that. This is it’s going to have to go, because it is spoiling this curve in here. The really really important part, the part I love about this tree is the part in here it comes up. Then sweeps down and this bit where it comes up here. So it kind of like engulfs you sort of coming around like these big arms, and the head’s pointing down, it’s coming towards the viewer and it’s bringing us in.
Removing The Branch
By having little shoots like this, this little branch is going to block that. If it had been on the other side, growing out this way towards me at the back, that would have been fantastic. But, not that lucky. Anyway, it’s not important don’t really need it so we will remove him. I’ll do that before we start wiring cos then it’s something I don’t have to work around.
So let’s take this Branch off.
The Chinese Juniper Bonsai Tree has Evergreen Foliage
And although it seems like we’ve got quite a long stretch of branch here without any foliage on, I’m not too worried about that because we’ve got foliage above it which will come around and cover this bit. Normally what happens with trees is that there’s not a lot of foliage on the inside where it’s dark. It’s all on the outside so quite happy with that. I’m not going to give you a detailed description of all wiring because there are hundreds of videos out there of people wiring bonsai. I’ll just give you a bit of an overview and you can watch how it evolves but if you would like me to do a video at some point, doing a wiring session, quite happy to do that just leave a comment and we’ll see what we can do.
I suppose the biggest thing with this branch, this first branch where it splits into two this quite this quite long and leggy and so hopefully over the next year or two we should get a bit of back budding a bit of foliage creeping further back up the branch. I’ll let you just watch for a while and I can rest my croaky voice.
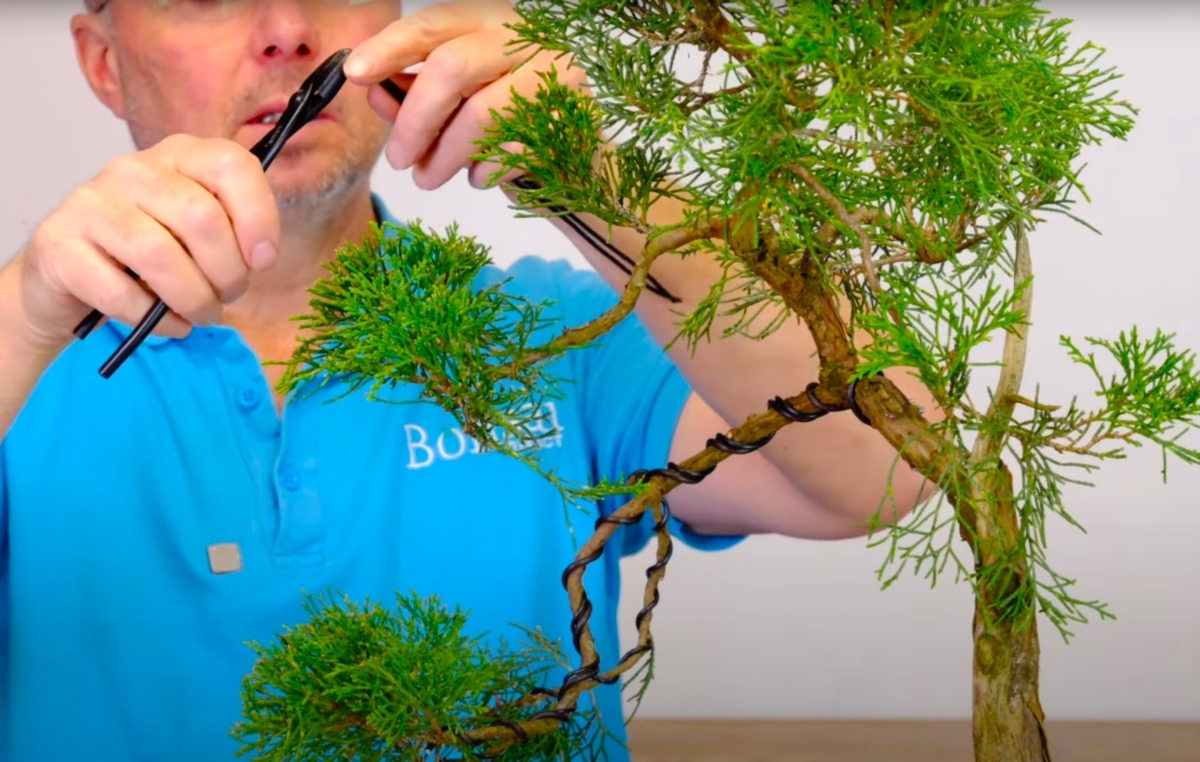
Wiring Down the Branches
I’ve got two branches coming from the same place that need the same size wire. What I tend to do is to use one longer piece of wire. Enough to do both branches, fold it in half and then close the end of it. This just gives me a nicer way, a cleaner way of applying the wire. Obviously you can do it separately, run two pieces down, it really doesn’t make a lot of difference this is just my preference.
If I look a little bit clumsy here I apologise, but I do try to do everything so that you can see it all. So quite often I can’t actually see what I’m doing, so I’m doing it by feel. Just going to position these branches, just roughly where they need to be at the moment,
I’m not going to try and be too precise. It’s a bit of a catch22 situation really because we need to get the branches pretty much in the right position to allow us to get the potting right, to get the position of the tree in the pots correct. But then when the tree is in the pots, it’s all wired in nice and solid and we know the tree is not going to move around or we’re not going to upset some of the wiring through the repotting process then we can just go through and tweak those branches and just make sure that they are in the right place.
Refine & Declutter the Design go the Chinese Juniper Bonsai Tree
So this part of the tree is quite important. There are two or three branches here and I’m going to select a couple of them. These ones will be able to give us a bit of foreground and a bit of background but also not interfering with the Jin as well. You’ll see what I mean sort of later on towards the end of the video, the spacing around the Jin is quite important so we don’t want to crisscross that with branches and we don’t want to clutter up that lovely curve either.
Well that’s the majority of the wiring done now. There’ll still be a few little bits to tweak. However, I generally do the heavier wiring at this stage and then any finer wiring with a very small wires I do after repotting. I find by the time I’ve teased out the roots, moved the tree around, those finer branches have all moved. So I tend to do that after repotting. Then also once it’s been repotted and it’s in its proper position in its new pot, then we’re going to tweak the branches up and down left to right a little bit. I’m happy with that now, that looks really good.
Tidy up the Foliage
I’m going to just tidy up the foliage a little bit, some of the shoots are quite long. I’ll just pinch them back, do a bit up here where you can see. Whenever we arrange rearrange foliage pads like this, it always takes a while for them to sort of grow back into shape. By bending them down and fanning them out a little bit, we end up with some gaps and it’ll take probably 2 or 3 years to really regrow into that space.
I’ll go through and just tidy up little bits just to make it look a bit smarter. Sometimes you get bits where underneath the branches where we brought branch down a little bit and a bit of foliage sort of sticks down. Like up here. I don’t want to take off too much. Mainly it’s just finger and thumb stuff. We got some little branches here they’re going to need tweaking a bit later on. It always makes quite a lot of difference I find when you clean up the underside of the branches, the foliage pad, so it’s nice and clean underneath and then gradually all the new foliage is on top.
Remove the Bonsai from its Pot
With most of the tidying up done now, there’s a few little bits to tweak but like I said we’ll do that after potting, now’s the time to take it out of its pot. Have a look in there, see what the roots are doing and a little bit of a tease out so let’s have a look at it. I’ve already taken off the anchor wire.
There we go. The roots are actually very healthy. Back at the beginning, the tree was quite wobbly in the pot and I thought it had a bit of root rot. But I think what happened is that where the top roots had died off. The new ones which had grown there weren’t any sort of thick heavy sort of duty roots holding it in. But actually the majority of the root ball was very very good. So that was quite nice to find. I do find that Junipers do very well in akadama. It gives it really good drainage it gets plenty of air around those roots.
Akadama is Great for Potting Chinese Juniper Bonsai Trees| Excellent Drainage Properties
Gets that point where you think I really need to stop fiddling, pinching out little bits here, tweaking the branches. And you have to remember that there’s next week, next month, next year and an ongoing process. Well, I’m really pleased with the way it’s come out. It’s not, certainly not what I thought of. When I started the video, when I started working on the tree, I had no idea really where we would end up.
As I was working and we cleaned up around the trunk here, and all these little features started to come out and it kind of spoke to me. I thought “well this is going to look really good”. So this is why I created this little hilltop here. So that it gave the impression of time washing away. The wind blowing away the soil. The soil erosion around here to expose these roots and over the years they’ve gradually died off.
Bonsai Roots
There are new roots growing in here, and I’ll give you some closeup shots. There’s a lovely little hole in here which is just a real bonus, that’s lovely, I’ve added some moss just to give it that impression of a nice Hill. Gradually the moss will grow all over, I will keep the moss away from the roots just to keep those roots shining through. I think it looks lovely, I think it just looks like a a lovely tree that’s kind of you know battered with time, but has still got that elegance and that beauty.
We have plenty of space in here, and the branches and the top of the tree lean forward. I will try to give you some better views. To show you how I feel it sort of draws us in and the branches coming around. It is very difficult when you’re seeing it all in two dimensions and of course I see it in three dimensions. So I’ll see if I can give you some better shots of that. And probably you know if we look forward in time it could even be that this branch, cos I’m not particularly keen on these two branches coming down.
Bonsai Foliage Pads
I quite like the idea of the pads here and of course we’ll get some back budding and maybe evolve some more pads around to thicken it out. So it could come right out very exaggerated or what we could do is basically, maybe one day when this branch has got a bit bigger, we could Jin this branch here. Make it quite dramatic and then that would give it a lot more age and character so it could evolve in a couple of different ways and a lot of that is just taste.
We’ll see where that takes us, where we end up. Well like I said, when I started the video I didn’t really have any ending in mind. I always let the tree take us there and this is what I saw along the way so. I like all of this coming around, here’s the main vein which actually starts in here and comes up around. Of course that will just keep getting thicker and bulkier in time and adding to the character around here. So Nicky if you are watching, no you can’t have it back.
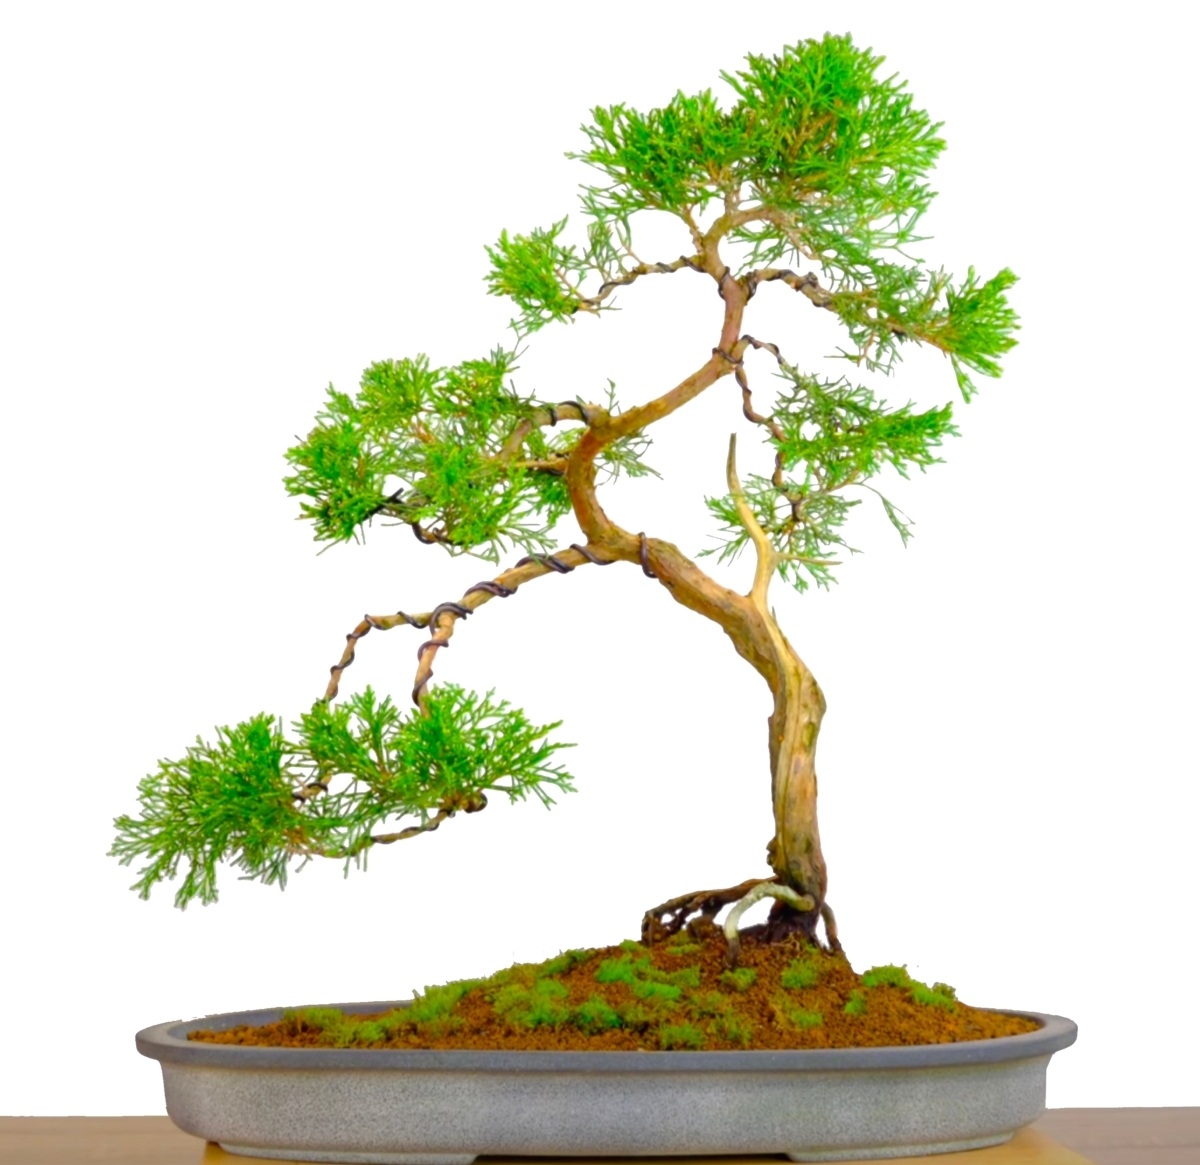
A Quick Overview of this Chinese Juniper Bonsai Tree
We have plenty of space around the main curves and the foliage pads will obviously grow and thicken up over the years. So the main trunk has got a really nice shape to it. The straight bit that was a problem initially, has blended in quite well now so the overall curves don’t sort of look odd against the straight bit if that kind of makes sense, that was the original problem. We’ve got some nice curves, the Jin has plenty of space around it so it’s not cluttered and is viewable easily, but doesn’t stand out on its own. Blends in very well with the rest of the tree. Foliage pads still have lots of growing to do and look forward to that.
The branch is just above the Jin, on the right hand side of the Jin as we’re looking at it. They will grow out and need to be a little bit longer and sort of meandered down to balance up that little bit of the tree on that side but overall it’s looking really good at the moment. So look forward to seeing it grow and evolve over the next few years. This will be the last video for 2024, I hope you’ve all had a great year. I hope you all have a fantastic Christmas and a really good New Year. Wouldn’t it be really lovely if 2025 could have less wars, and be as peaceful as our bonsai. Take care.


0 replies