Welcome to another expert guide from Bonsai Master Lloyd Noall. Here, we delve into the art of pruning and styling the hardy English Maple bonsai (Acer campestre). Also known as the Field Maple, this native species is celebrated for its refinement, striking colours and beautiful leaf shape. Today, Lloyd demonstrates advanced techniques for shaping and refining a large, mature example of an Acer campestre. This bonsai is approaching 40 years old and has a wonderful well established, powerful and majestic design. This bonsai is perfect for showcasing some pruning and styling techniques.
The best time to prune and refine your English Maple bonsai is during the autumn or winter months, when the tree is out of leaf. At this time, the bare branches reveal the tree’s structure, allowing you to focus on its form with precision. As Lloyd explains, “Pruning in the dormant season is key to shaping the tree because you can clearly see the natural lines of the trunk and branches.”
Unlike some other species, Maple bonsai trees have particularly delicate bark. Due to this, they are less suitable for styling with traditional bonsai wire. “With maples, it’s not just about the result—it’s about protecting the tree from unnecessary stress and scarring,” Lloyd advises. In this tutorial, he shares his expert techniques for achieving beautiful angles and shapes without the use of wire. This ensures that your tree remains healthy and wire scar-free.
This impressive English Maple bonsai has been featured before in Lloyd’s video, “Japanese Maple Bonsai or English Maple Bonsai Tree? Which One Makes the Best Bonsai?” where its natural beauty and potential were first highlighted. Now, join Lloyd as he demonstrates the next steps in transforming this hardy native species into a breathtaking bonsai masterpiece.
Transcription of this video about Maple Bonsai Pruning – A Large Specimen Hardy English Acer Bonsai Tree

It’s sad in a way, after all that effort of producing beautiful leaves, that they shrivel up and fall off. But it’s also really exciting because it’s a great time to see all the details that’s been evolving over the past growing season.
I’ve taken all the old leaves off. Normally, I would clean all this but I don’t know I kind of like them. They’re really cheery and they’re crispy and there’s something really lovely about Autumn Leaves. Anyway, what we can do now is we can see the actual structure of the tree. All the shapes of the branches where they start from and where they end. All the twigs, and little lumps and bumps and things like that. So that’s what we are going to focus on, looking at the structure of the tree. Picking out the things that we like about it, and the things that we think we need improving. That is a process that doing continually throughout growing the Bonsai.
The Field Maple / Acer campestre
This is an Acer campestre or Field Maple. While we just have a look at the tree and spin it around and have a good look at it, I will just let you know that this tree has only ever been pruned to shape. I germinated it late 1980s can’t remember exactly when but it has only ever been pruned and never wired and to achieve all these lovely shapes. That’s what I’m going to show you now, how I do that just by pruning.
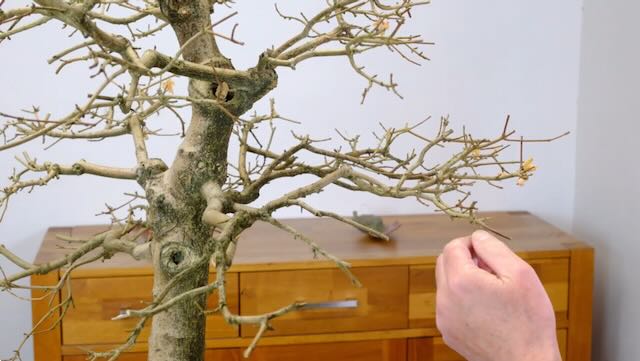
I’m going to start pruning on this branch here. I always start pruning at the bottom of the tree and work my way up. That way I can sort of prune in like that and that just helps me keep the shape. This one’s been pruned on a previous video, the one where I compare this tree to a Japanese maple. So that one’s pretty much done. Still a bit more to do, but we’re going to work on this branch here.
Now I’m going to prune it. I’ll explain what I’m doing and why I’m doing it as I go along. I like this it’s here it’s got a nice angle down it’s got a split here. That’s about a 60% 40% split which is great. It’s not equal just a little bit uneven there, that’s good, that gives a nice character. I like the way this one comes up this comes down and continues around here. Every time there’s a change in shape, that’s where it’s been pruned comes down. Now this is a bit where I’ve got to do some work. I’m not really happy with this bit, I like it’s coming down here, bit of a kink, there’s some nice shape going on there. Let’s just alter this bit here.
Make sure you have the necessary tools for Maple Bonsai Pruning
This just a little bit straight and this is a bit confusing so let’s just take that one off. With some fairly large medium sized knob cutters, take that into there. As you can see this is a much nicer line some undulation. I’ve cut it quite hard in here so that when this heals over we’ll end up with some nice, just a little bit of scar in there, but it will just flow with the branch. A little bit of confusion going on with these two sort of cross over so I’m going to just sort that out.
We got this nice split here, little bit of a prune up around here, clean out some of those shoots, because we don’t want any more around here we want this to grow down here. Let’s see if we can just sort of make out something like that, got a lovely flow down here. We’ve got lots of buds all the way along here they will start to grow. This is a nice shape, let’s just take out that straight bit there. There’s a couple of shoots going to grow up, but I want this I want this branch to sweep down and flow out this way.
Now moving around let’s have a look and see what’s going on around here. What I will do is prune it back to the next buds, and gradually work on some nice little shapes and undulations there. All right, and working down here this is quite nice. I like this, not so keen on this bit up here so let’s just take off around there, keeps that flow nice come down here.
Regularly look at your tree whilst carrying out any work
Look at the start of this branch, I love that a little bit of a wiggle it’s just got some lovely very subtle character. That’s the kind of thing I love in my bonsai. As I go through the branches I clean up any old lumps and stumps.
This part of the branch is very straight so I’m feeling for some buds so that I can prune it back and when those buds have grown I can trim back the stump. With these branches now pruned, looks a little bit bare because obviously a lot of the twigs have gone but the shape is really clear now. The lovely undulations and little sort of deviations, beautiful curves look at this. It’s very clear and easy to see all of the shape, where the branches are going to grow. Now we have to imagine all the new shoots next spring start to come out. Some of those shoots we’ll keep, and some of them we’ll take off. So it’s an ongoing process and it’s fantastic, and I love that about it I look forward to spring now and seeing the new shoots come out.
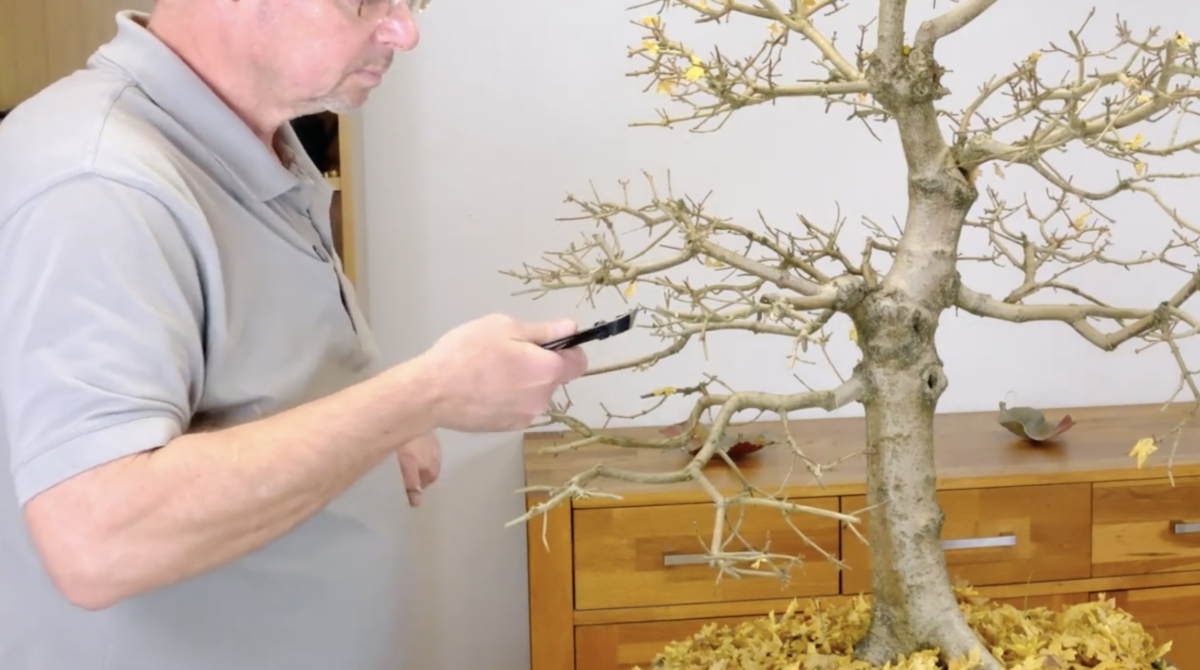
As we come around, you can see the difference between the ones that have been pruned and got nice shape and very easy and clear and defined and then the ones that haven’t pruned are quite cluttered and criss crossing. So, we’ll carry on pruning now and it’s starting to look really good. This branch has a lot of clusters heavy lumps on the ends of the branches where lots of buds have all started to grow at the same time. That’s made it very thick and lumpy.
Don’t be scared of removing branches
Now I have to go through and just prune back some of those. This will allow the buds further down the branches start to grow. If I can’t actually see the buds to prune back to I can normally feel them. This branch is very heavy and confusing just watch what happens when I remove it. The confusion has now gone and the eye can follow the branch line all the way along to the twigs.
With most of the pruning done now, the top of the tree is very thick and chunky. There’s lots of areas which need a lot of refining, I will do that over the next 2 – 3 years. If we take this zone here, we got this big chunky bit this cluster of branches on the end. That’s not particularly attractive. What I’ve done is I’ve just pruned this. For now, I’m going to let these buds here grow. Once he’s a good size, I can then prune him back to a bud back here.
“A bonsai is never finished”
What I have to be careful of is that if I prune this off now these buds suddenly could put on a growth spurt very fast and what that means is that the growth the branch extension is quite long and powerful and there’s not any buds along it which means I haven’t gained anything, I’ve lost that opportunity. By doing it slowly, just keeping this bit here this bit, will grow very slowly. Maple buds always come in pairs and they’re opposite and the same with the whole of the top of the tree so even up here this will all come off in the next 2 to 3 years and new branches will come through and they will be smaller much thinner more refined more twiggy and that will create a really nice crown a nice top of the tree.
The other benefit is of removing the top of the tree gradually is that it gives the time gives the bottom branches time to grow and thicken up as well so really I want these branches down here to be this one here particularly about 1/3 the size of the trunk. He’s got quite a lot of thickening up to do and he really wants to be out to about here and this branch needs to be at least twice as thick as this it is now.
This branch, really lovely and creeping its way out into this space, here this one I will reduce down gradually as well. Therefore, we’re increasing the tapering of the whole tree. The branches, the top of the tree and everything and also along the way. Creating those changes in direction those little undulations, ups, downs, side to side, little wiggles here and there to get this lovely flow that we’ve got here.

We wish we could see this bonsai in 100 years
Most of this will be removed and changed, it’s a change over I suppose. So growing new ones into the space so that I can remove the heavier thicker more dominant branches that helps push the energy back down to the bottom of the tree where we really want to thicken up. Get those twigs and those branches really growing down there. So it’s this ongoing process year after year, after year, growing season after growing season and that is absolutely fantastic.
I’m really pleased with the way it’s coming on now and certainly over another 30 odd years should be looking fantastic. Another 100 years, fab, I hope it’s still looking great growing on nicely then.
I hope you’ve enjoyed the video, I hope you’ve learned something along the way or given you some thought and please do what I do as well, go out and look at full size trees.
Take care


0 replies