🍁 Welcome to the third and final instalment in our advanced maple bonsai pruning trilogy, with Bonsai Master Lloyd Noall. This time, we focus on the captivating Japanese Maple bonsai (Acer palmatum). Known for its vibrant seasonal colour changes, intricate branch structure, and delicate leaves, the Japanese Maple is a favourite among bonsai enthusiasts worldwide. Today, Lloyd takes you through advanced techniques to shape, style, and refine a stunning mature specimen of this iconic tree. After exploring the pruning, styling and rugged charm of the English Maple (Acer campestre) in our previous video, we’re now ready to unlock the secrets of this amazing Japanese species.
This particular Japanese Maple bonsai, over 35 years old, boasts a beautifully aged trunk and an elegant, spreading canopy. Its natural grace and character make it the perfect subject for showcasing expert-level pruning and styling techniques. As Lloyd points out, “Japanese Maples are the epitome of elegance in bonsai—they demand precision and care to bring out their full potential.”
The ideal time to prune and refine a Japanese Maple is in late autumn or winter, when the leaves have fallen. With the bare branches fully visible, it’s easier to analyse the structure and refine the design.
Lloyd explains, “Working on a Japanese Maple during its dormant phase allows you to focus on its natural lines and achieve a balanced, artistic shape.”
Unlike other bonsai species, Japanese Maples are particularly sensitive to wire scarring. Their thin, delicate bark requires a thoughtful approach to styling. In this tutorial, Lloyd demonstrates his wire-free techniques to create beautiful movement in the branches without compromising the tree’s health. These methods protect the tree while still achieving stunning results.
This Japanese Maple bonsai first appeared in Lloyd’s popular video, “Japanese Maple vs. Trident Maple: Which is Best for Bonsai?” where it showcased its potential. Now, join Lloyd as he brings this iconic species to life, demonstrating how precision and artistry can elevate your bonsai to a masterpiece.
🎥 Missed part one? Watch it here: https://youtu.be/uyuF-wIZo5g.
🎥 Missed part two? Watch it here: https://youtu.be/TaUobFQs3Yo Part 2 of the trilogy is about a Large 40 year old English Maple Bonsai: Advanced Pruning & Styling Techniques.
Transcription of this video about Japanese Maple Bonsai Pruning – An iconic bonsai species & a remarkable favourite.

I’m sitting here wondering what I can do for the introduction for this video. And then I thought I won’t do one so let’s go pruning!
This year it’s 2024 and it’s coming towards the end of November, I think it’s about the 24th anyway I’m not very good with dates, so it’s coming towards the end of November and something very strange has happened. This year as you can see most of the leaves have fallen off. The last few, there’s a few little ones left on here, it was beautiful autumn colours, I think I’ve got a video of it in colour when we were comparing when I was comparing the campestre to this one. Anyway if I can I’ll just snip that in you can see the Autumn colour.
The weather has confused bonsai this year.
Most of the leaves are gone now except for this very strange thing which has happened where we’ve got this, this new growth which has appeared in the past few weeks really which is quite unusual but the weather has been very strange and it’s playing havoc with the bonsai. So I think they sort of thought it was spring the sort of weather’s been bit up and down. Anyway bit confused, probably like me, I love the start of this bonsai the way it just comes in of this big root and these ones sort of spread around to give it some so it’s like gripping the ground. Nice branch here, this in a few years when it thickens up this has got to be a lot, lot bigger, about this sort of size.
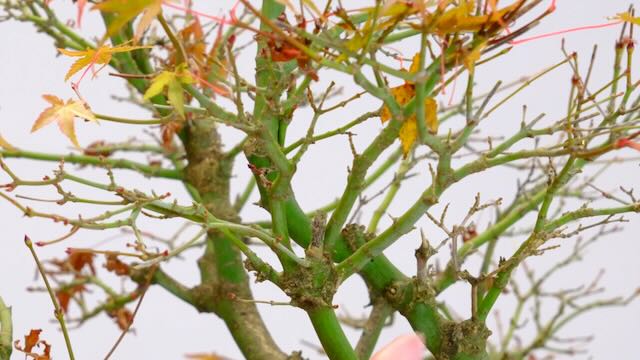
There are a few places where we need to thin out some of the branches. What can happen is that when these sorts of trees are pruned, and I mean sort of like Maples trees with heavy foliage canopies, what we tend to do is just prune through the summertime. We just keep pruning off the new shoots, the extensions and what that can do is the branches back inside can become quite thick and heavy in places and we can end up with a situation where we can get very heavy clusters where constant new shoots are being pushed out from the same place.
Structural pruning should be done in winter.
You can see here what I mean, we’ve got this cluster and we’ve got one, two, little one growing out there, three, and another smaller one four so there’s this cluster. So throughout the summer when we’ve just been pruning off the longer shoots there back budding continually around this area and that’s got this big lumpy bit here and it’s not very attractive so this is a place that we’re going to have a look at and sort out. And it looks fine all the time that there’s foliage on the trees and there’s lovely leaves and everything looks great and the leaves to me are, they are the icing on the cake.
The leaves are beautiful you know love them but underneath the actual bone structure that is the real beaut- that’s the bit I really love I find challenging, because if you can get that right if you can get the structure right, then the leaves, the icing, the beautiful canopy, the foliage, it’s going to look stunning. That’s what we’re going to do today we’re going to look at these sort of parts which have grown on, got a bit lumpy, bit big, do some basic pruning, as well and go from there.
Remember to look at each branch individually, and then as a whole.
There are many things that we need to consider in this area. One of them is how we reduce the lump, the second is how we make this look more attractive, and the third is how we sort out the tapering so we’ve got quite a thick branch and we need to make it get thinner quite quickly because this is the area where this branch actually needs to finish, so we don’t want it to come out too far and we don’t want it to end up stumpy again. So we’ve got to think about proportions, the lump, and to make it look beautiful.
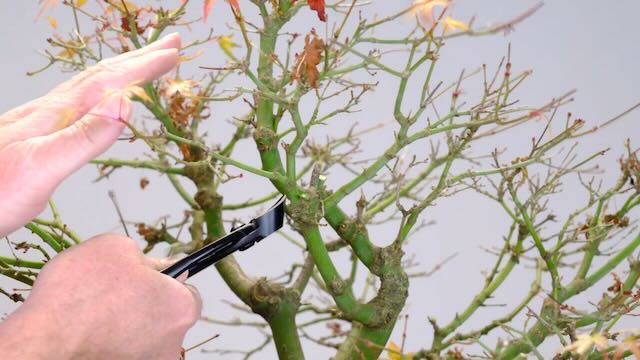
Each of these let’s say four main branches, there are some smaller ones there’s lots of buds waiting to appear, but let’s say four main branches here. Each of them are actually on their own. Individually, they’re quite nice shapes and from here onwards from this let’s say the start here, each one would make a nice branch on its own. So, spoilt for choice really. What we have to do is narrow it down and think which one’s growing into the right space, which one has the right sort of size for this space. Obviously we can grow them on, we can shorten them, we can take a small one and grow it on, so there’s lots of things we can do here.
“How do we figure out the right one?”
Well it’s relatively simple. First thing I do is I look at which direction each branch is going into. This one I like because I like this shape here. It’s a very nice little curve to it here, got a little curve on the inside here and it splits down quite nicely as it gets to the end. This one is quite straight so it follows this line, so it’s not quite so interesting. This one here I like because it’s got a nice split, so a little bit of a curve so it’ll change direction a bit up here, a little bit straight. This bit I like this split here and I like it as it splits up here. This one is a bit too small, so the the change in size between this and this is going to be a bit drastic.
I think what we could do here is take out this middle one which is the more dominant shoot anyway so this one does sort of take over a bit and comes much further out. So what we’re going to do is we’re just going to clean up this area, take off these couple of little shoots, and see what we’ve got left. I will stop talking for a while and just let you watch.
You will need some patience as it takes time for bonsai to grow!
I hope you can see how this has improved. There’s still a little bit of a clumpy bit there but that will improve and of course the trees always going to grow. Down here, this area, new buds will start to grow from here and here and here, so we can grow those on. Here’s a quick mockup of what I mean.
We’ve spent quite a lot of time in one area, so sorry about that but I just wanted to show you the details, and to me the details are so important to make each part of our bonsai look beautiful. From the very tips, all all the way down through to the roots and where the roots disappear into the soil. If we can get those details and every part looking beautiful, then we can really appreciate the bonsai throughout the seasons, and deciduous trees like this, they will look good all year round.
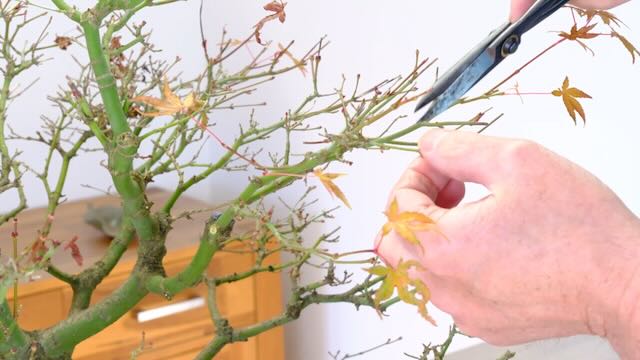
Let’s finish pruning this branch, just the tips, and then we’ll work our way through the rest of the branches. I’m thinning out the twigs here, choosing twigs again growing in the right direction, or have a nice shape. Trying to create a bit of space between the twigs, and that’ll allow for new buds to come through, and nicer shaped twigs and branches to not only look good now, but also to hold the foliage in a much nicer way throughout the summer.

Prune to allow growth.
Also at this stage, I’m pruning back the ends of the twigs, to allow for growth next year.
When the spring growth comes, I don’t want it just to grow from the ends of the twigs, because otherwise the tree will just keep getting bigger. So I’m pruning the tree back as well at this stage, so that the new shoes from next season will grow further back down the twigs and the branches. Rather me talking all the way through, just watch how I prune the to the branches and hopefully you’ll see what I’m trying to achieve.
A bonsai is never finished!
Cleaning off an old stump here, obviously where I’ve pruned the branch back to create that nice curve. I have left a little shoot there just to one side, and I’ll put some wound sealer on this bit here just to prevent any die back here and give that little shoot a chance to grow.
Well there we have it. We’re all pruned, and I think it looks fantastic it looks stunning.
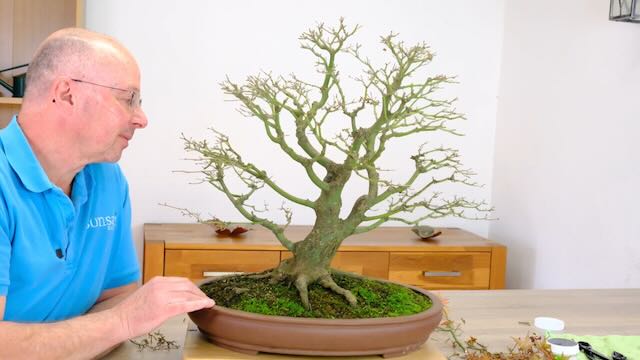
Still lots of places to improve, time itself will start to mould in a lot of these shapes and we’ll still change this branch down here, it needs to come out and and flow more out of this way. So we can change that, and all of these sort of angular bits, they will flow in and we can change them. We can bring out new branches, no problem. That’s fantastic. Lots of lovely details, lots of shapes, lots of curves and lots of great things to look forward to.
“Just a few details about the actual tree itself.”
It is one that I have grown from started as an air layer, about the late 1980s, has been grown on from then. Never been wired, always been pruned to shape. All my deciduous trees Oaks, Beech, Birch, and Maples they’re all pruned to shape.


0 replies