Today, bonsai expert Lloyd Noall takes on a critical task—repotting and pruning a truly magnificent Japanese maple bonsai that has been growing for an incredible 110 years.
This tree has been part of Lloyd’s collection for over 25 years, after arriving from Japan with a broken top. Over the years, it has been carefully nurtured, shaped, and trained, but now it’s in desperate need of a repot. The root ball has become rock solid, making it essential to take action before the tree’s buds swell any further.
Join Lloyd as he carefully removes the tree from its pot, assesses the roots, and performs some precise yet drastic root pruning using a Japanese pull saw—a tool that makes the process both efficient and minimally stressful for the tree. If you’re a bit squeamish, you might want to look away when the saw comes out 😂
As Lloyd explains, maintaining a bonsai like this is an ongoing process that requires patience, skill, and an understanding of tree health. He’ll walk us through his technique for ensuring new root growth while preserving the tree’s stability.

Once the root pruning is complete, it’s time to work fresh akadama into the soil, reposition the tree in its pot, and give it a thorough watering. But the work doesn’t stop there! Lloyd then moves on to pruning the top growth, ensuring the tree maintains its beautiful tapered shape and balanced structure. He’ll demonstrate how strategic pruning encourages tighter foliage pads and better overall ramification.
Bonsai is an art form that spans generations, and this tree is a perfect example of that. It has seen decades of careful cultivation, and today’s work ensures it will continue to thrive for years to come.
Will you be able to spot where the tree was originally damaged? Stick around to the end of the video to find out!
110 year old Japanese Maple Bonsai Tree | Time for a Repot
This Japanese maple is desperate to be repotted. Its root ball is quite solid. It obviously hasn’t been done for a few years. It could be four or five years actually; time goes so fast. Now is the time—I’ve got to get it done before the buds swell any more. So it might call for a bit of drastic action on the roots. But we’ll see how it goes. So, let’s get it out of this pot.
The Root Ball of this Huge Japanese Maple Bonsai is Like a Brick!
The root ball on this maple is incredibly hard; not just around the outside but all the way through the middle as well. It is a bit like a brick! And therefore, I know that by tilting the tree like this and just by pulling the pot off the root ball, I’m not going to do it any harm. And because the pot has fairly straight, smooth sides, without any curves, the root ball does actually slide out quite nicely.
Well, that was easy.
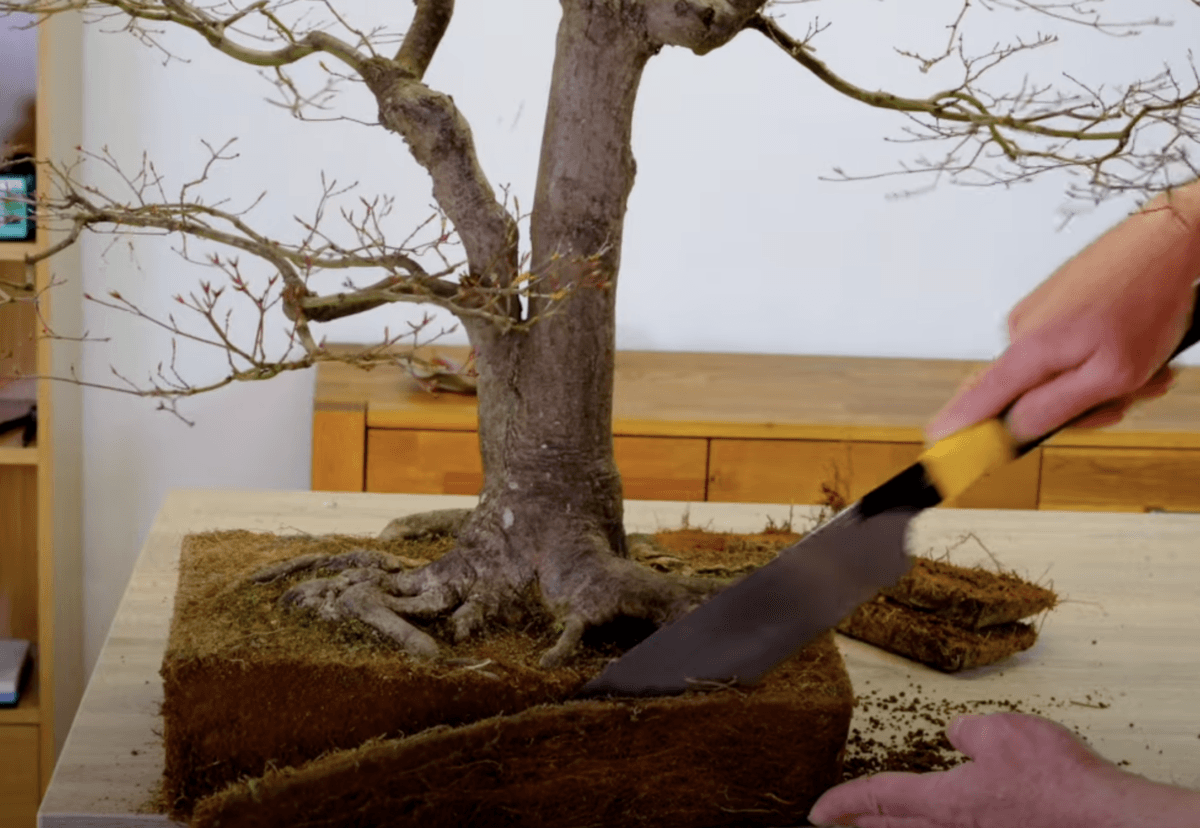
You Need a Saw!
This root ball is solid.
That is not a saw! This is a saw! This next scene is not for the faint-hearted. So if you are a little bit squeamish, please close your eyes now. The Japanese pull saw is a fantastic tool to use. It’s got very, very fine teeth that are very sharp, and it’s ideal for sawing through roots like this. When they are very solid and compact like this, you can’t really tease them out with a chopstick. So I find sawing like this is an ideal way to reduce the root ball with as little stress to the tree as possible.
The Japanese Pull Saw Advantage
The Japanese pull saw has got a very, very thin blade because it cuts on the pull. So it doesn’t need to be quite so thick as a traditional saw. And it’s so good, in fact, that I think lots of people use it for woodwork as well, which is quite strange really.
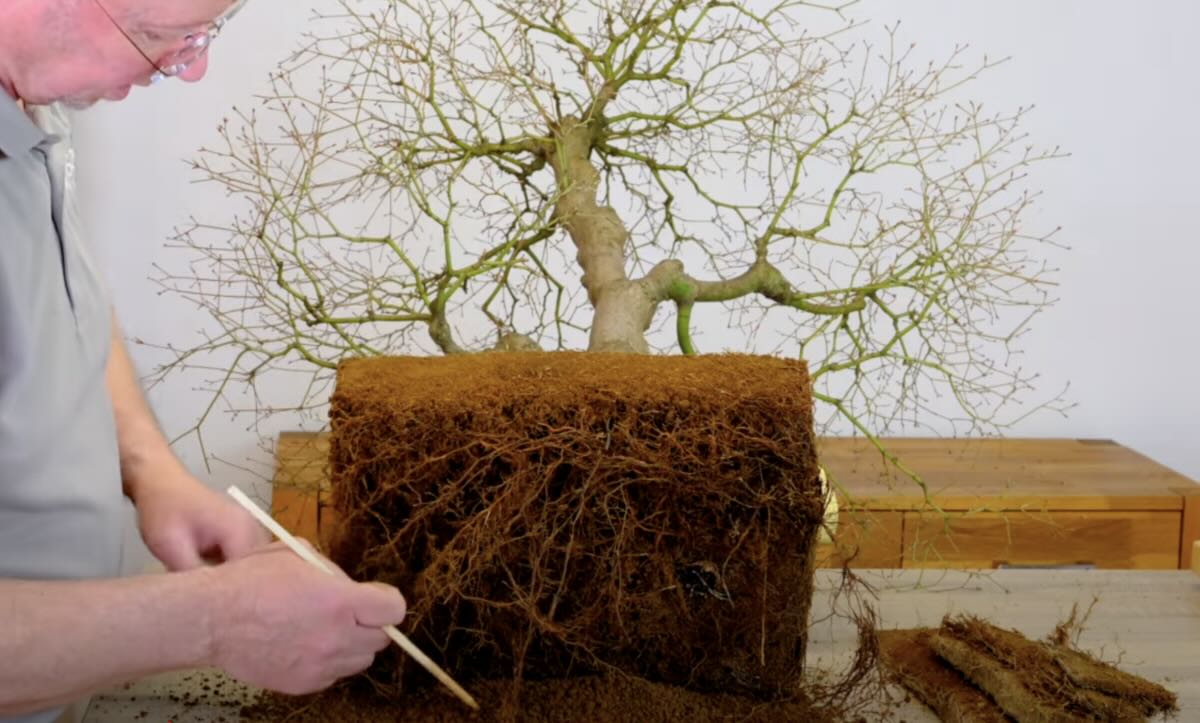
It looks quite strange actually when you look at the root ball like this. It doesn’t look like there are any small roots actually left in the root ball. That’s because as the saw goes through the soil, it smooths over the roots. So, you get this nice, smooth soil effect. But once I start teasing away, there are lots and lots of small fibrous roots left inside the root ball.
Choosing the Right Soil for this Mature Japanese Maple Bonsai Specimen
I’m using hard-grade akadama, medium-size balls generally. I find the trees do really well in this, apart from a few oddities. But generally, most of my trees, as they get older, end up in this hard-grade akadama. It drains really well; the middle of the root ball becomes very solid, in fact, like a brick. Which is ideal for older trees. And then, as we root prune, as we are here, the new smaller roots grow out into the new soil. The old soil that’s in the middle of the root ball stays very hard, and that creates a very solid block for the tree to cling onto, as it would do normally if it was fully sized.
So, by trimming around the outside and adding fresh akadama soil, the new roots can then grow out into that nice, new soil. There’s plenty of air, plenty of good drainage for the really fine roots. So all is good. The bottom of the root ball, as you can see here, was pretty loose actually. Now I am using the old faithful chopstick and a pair of root shears to sort out this part.
Healthy Roots Mean a Healthy Tree
The roots are really healthy and growing really well. They are a lovely colour—a lovely reddish-brown colour. There’s no black or mushy bits to the root ball, so there’s no root rot. There are some very, very fine roots, as well as the thicker roots, which we’re obviously cutting back to promote newer fibrous roots, but generally, it’s really good. I am really happy with this root ball.
What I’ve got to do now is just carefully work my way around this top edge here, and this I do have to do with a chopstick. This just softens that edge. So, when it’s back in the pot and the new soil is in, we won’t end up with a nasty line around the top here. I’m just going to work my way around. I don’t need to do very much. Just blend it in, really.
Japanese Maple Bonsai | Back in the Pot
With the mesh covering the holes, and the anchor wires in, I can cover the bottom of the pot with some fresh akadama and then reposition the tree back in its pot. With a bit of fresh akadama worked in around the edge of the root ball, it’s ready then to go and give it a good watering!
That’s most of the root work done now. I haven’t quite finished it; it’s a little bit high in the pot. I don’t know whether you can see that from there. But it is just slightly high, and the reason that I’ve done that is because I want to still remove some of this top soil around here. I want to go in with a chopstick and clean around these lovely roots.
Timing Repotting with the Seasons
The season, the potting season, seems to be getting shorter and shorter in this country. The ideal time to repot deciduous trees like this is when the worst of the winter is over, but before spring arrives—before that sort of bud break. Before the bud starts to swell so that the tree can go through the winter with all its roots intact, and then we just trim those roots back just before spring starts.
And that used to be around 4-5 weeks, but now it seems to be down to about 2 to 3 weeks. So I’m having to juggle things around a little bit to try and get as many trees potted as possible. Therefore, I’m doing things a little bit back to front, which I don’t like doing, but I’m just having to.
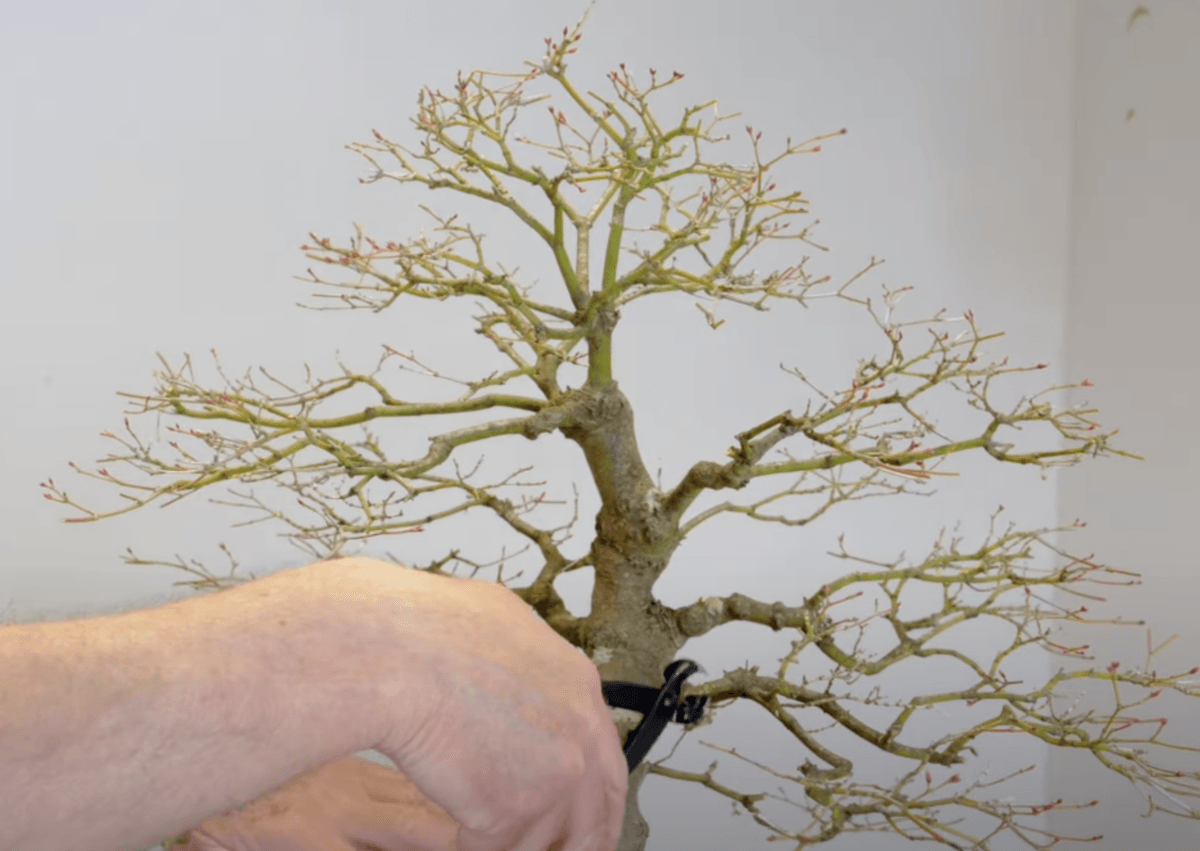
Pruning for the Next Season
What I’m going to do now is just do some pruning. There are some long shoots and twigs that need taking back and thinning out a little bit, getting ready for the next season’s growth.
I nearly always start my pruning from the bottom of the bonsai, because this is the widest point. As I go up, everything has to get shorter and go inwards towards the top of the tree. Then we get this lovely mushroomy shape.
The History of This Bonsai
This particular bonsai was given to me by a friend and work colleague. He worked for a very large bonsai company in Holland. They imported thousands and thousands of bonsai every week. This was one of a batch of specimen bonsai. It came in from Japan, and they were very old at the time. I can’t remember exactly, but I think they were about 80-85 years old then. Unfortunately, the top had been snapped off in transit.
It would take them many years to grow, so I was asked to kindly grow it on and repair the bonsai. I’ve been doing that for the past 25 years or so, and now it is looking rather splendid.
Wrapping Up
The roots have been pruned, and the top of the tree has been pruned, ready for the new season’s growth. Now I can put this tree back outside and let it carry on budding, leafing up, and growing for another year.
I apologize for the ‘saw joke’ at the beginning of the video. I couldn’t resist that one! Anyway, I hope you’ve enjoyed it. If you have, please subscribe. I have lots more videos coming out. Please hit the notification button so you don’t miss out on those. For now, take care!


0 replies