Welcome to another exciting bonsai tutorial with Bonsai Direct! In this video, we’re diving into part two of our Japanese Black Pine Bonsai tree styling series, focusing on a magnificent 60-year-old specimen.
I’m Lloyd Noall, a bonsai expert with decades of experience, and today we’ll be exploring the crucial middle section of the bonsai – the trunk and main branches. Our goal is to create a cohesive design that flows seamlessly from the base to the apex, ensuring that every part of the tree tells the same story.
In this tutorial, you’ll learn:
- How to analyze your tree from different angles
- The importance of creating harmony between the lower and upper sections
- My three-part approach to bonsai design
- Techniques for visualising the final shape before making any cuts
We’ll start by examining the tree’s current structure, focusing on blending the top with the bottom to create a unified narrative. I’ll demonstrate how to identify the tree’s natural flow and how to enhance it through careful pruning and wiring.
As we progress, I’ll share my insights on the importance of patience in bonsai design. Sometimes, it takes hours, days, or even years to fully realise a tree’s potential. We’ll discuss how to recognise when a tree is ready for styling and when it’s best to let it grow and evolve naturally.
So settle in, and let’s embark on this bonsai journey together. We hope you’ll pick up valuable insights that will elevate your bonsai styling skills.
Japanese Black Pine Bonsai Tree | Establishing the Bonsai’s Structure
We’ve got a really lovely start to this Bonsai. In the last video, in part one of this session, we uncovered and had a good look at everything around here. The start of the bonsai. Now we’re going to move up to the next part, around here.
In this next part, I shall be sorting out this bit. It’s going to be really important because what we’ve got to do, is to blend the top of the tree in with the bottom. By the bottom, I mean the main trunk itself. Because we’ve got some quite nice shapes and we’ve got this kind of lean to it. This kind of bit that comes out this way. There is nothing out here – obviously. But, we can change that. We can grow branches. That’s easy really. It just takes a bit of time.
Creating a Harmonious Design
But what I really want to do is to get this part up here, working with down here so that they are telling the same story. Trees grow in certain ways, influenced by weather conditions or the environment in which they grow. This one suggests a particular story due to its unique shape and twisty form. So, I want the top of the tree to tell the same story.
I don’t want to just bend it randomly and try to balance it out. Instead, I want to understand what’s happening here and how we can make the two work together. So, what we’re going to do is spin this around a couple of times. I want you to have a look, and I’m going to have a look as well.
Analysing the Tree from Different Angles
While it’s turning, observe the different curves and how they change as we adjust the angle. As we turn it, the shapes will shift, and we need to find a really nice shape—a smooth, natural flow that we can work with and develop.
I won’t say anything at first, I just want you to watch, and then we’ll do it again.
Focusing on the Main Branches
We’re going to have a look all the way around again, with a slight difference this time. Here, you can see that I have cut off the top of the tree. This makes it much easier to focus just on the main branches.
Sometimes, the big foliage can be distracting because it draws attention away from the most important part—the start of the main branches.
The Three-Part Bonsai Design Approach
This is the second part of the design, and I break it down into three stages.
1️⃣ First Stage – Developing the start of the bonsai, ensuring a strong foundation. Once I’m happy with that, I move on.
2️⃣ Second Stage – Focusing on the mid-section, which is what we are working on now. Analysing different shapes helps us determine how the tree should develop.
3️⃣ Third Stage – Foliage and twigs, or what I like to call the icing on the cake.
Too often, people focus on the foliage pads to make them look nice, but the inner structure lacks depth and character. That’s why I always start with the trunk and mid-section before shaping the finer details.
Visualising the Bonsai’s Future Shape
After reviewing all the different options and branch movements, I look for an overall shape that mimics the trunk line and makes sense. Only when I reach that level of clarity do I begin physically working on the bonsai.
This decision-making process can take hours, days, or even years. Sometimes, I prefer to let it grow and evolve a bit more before committing to a shape. But once I can clearly see where the tree is going, I can start working on it with confidence.
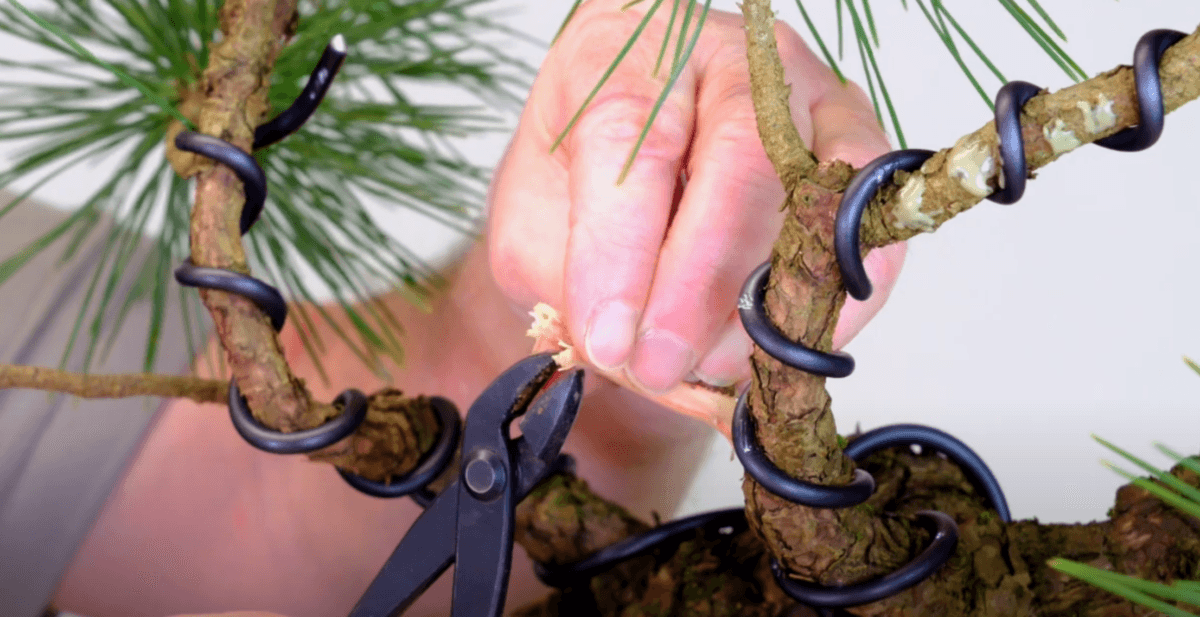
Wiring Techniques for Healthy Growth
Take care when you’re wiring, especially with thick wire like this one. Try to avoid using the tree itself to bend the wire around. Instead, use either your fingers or pliers to create the bend before carefully placing it on the tree.
This helps prevent damage to the bark—or worse, the cambium layer beneath the bark, which is crucial for the tree’s health.
Protecting New Growth
I’m taking great care not to squash or damage any of the tiny buds and shoots, as some of them will be essential later on.
It currently looks like a big green shaggy monster—but that’s great!
Anyway, that’s enough wiring for now. Any small wiring adjustments or pruning will be done in the next part—Part 3.
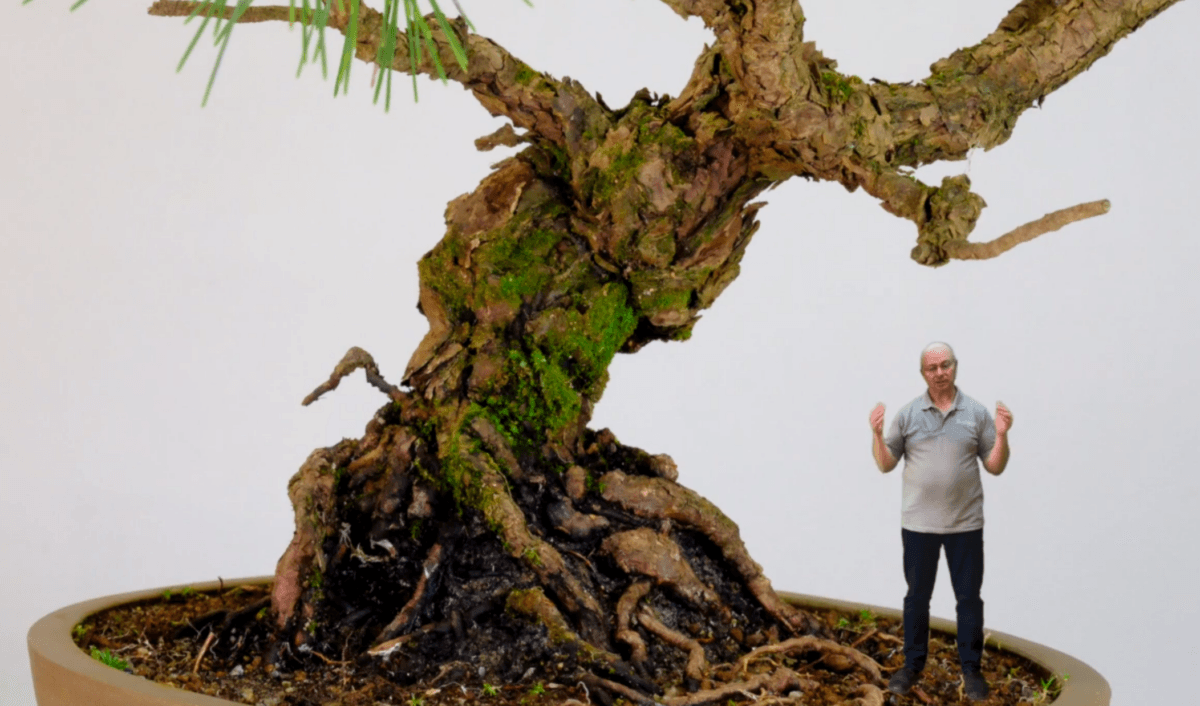
The Japanese Black Pine Bonsai Tree Transformation is Underway
Well, that certainly looks different! I know it might seem a little strange at this stage, and it will look unusual for a few years. But as new buds sprout and develop into twigs and branches, everything will start to flow naturally with the trunk’s movement.
At this point, we can almost feel the wind shaping this tree, just as it would in nature over many years.
What’s Next for this Japanese Black Pine Bonsai tree?
There’s still a bit more work to do. We need to fine-tune the branches, but that will happen after repotting.
In Part 3, we’ll be focusing on root work and the next steps in the bonsai’s evolution. If you haven’t already, be sure to subscribe and turn on notifications so you don’t miss it.
For now, take care, and I’ll see you in the next episode!


0 replies