
Bonsai Master Lloyd Noall has designed a fantastic range of bonsai tree pruning, repotting & wiring kits which are perfect for beginners who want hands on experience growing bonsai trees. They include Step-by-Step guides and online tutorials and are designed for you to learn how to grow a bonsai tree. These kits include a Chinese Elm (Ulmus parvifolia) bonsai tree chosen for their fantastic ability to re-grow quickly and make beautiful and artistic bonsai, ideal for beginners. These kits include the accessories required to prune and wire and grow healthy trees.
Below you can watch Lloyd’s Bonsai Wiring Tutorial and see his step-by-step guide.
Learn from the master!
Why do we wire bonsai trees?
Wiring is a technique used in the art of bonsai to create and refine the shapes of the main trunk and branches. Bonsai wire serves as a useful guide, allowing you to shape and manipulate the growth direction of branches. Thus, ultimately influencing the overall form of the tree. This meticulous process, enhances the natural beauty of the miniature tree.
The Choice of Aluminium: Flexibility
Among the various materials available, soft aluminium wire stands out as a preferred option. Its pliability allows for gentle bending without causing harm to the delicate bark and branches of the bonsai, facilitating a smooth shaping process. Beyond its flexibility, aluminium wire is rust-resistant, a crucial characteristic when working with bonsai trees. This not only safeguards the tree’s health but also extends the lifespan of the wire, permitting multiple uses over the years.
Aluminium Wire does not rust
Beyond its functional advantages, soft aluminium wire offers an aesthetic appeal. Available in various thicknesses, you can select a wire that supports the trunk or branches that you are trying to form. This ensures that the wiring process remains visually unobtrusive, allowing the inherent elegance of the bonsai to shine through. In general bonsai wire is neutral brown in colour so it is less obtrusive.
Please do watch our videos – it is most important not to ‘wind’ the wire round the trunk or branch as this tightens and scars the bark. You need to use your thumb and fingers to place the wire. Please check every 4-6 weeks to ensure the wire is not too tight and remove and re-wire as necessary.
Scroll past the step-by-step guide for a transcription of the video
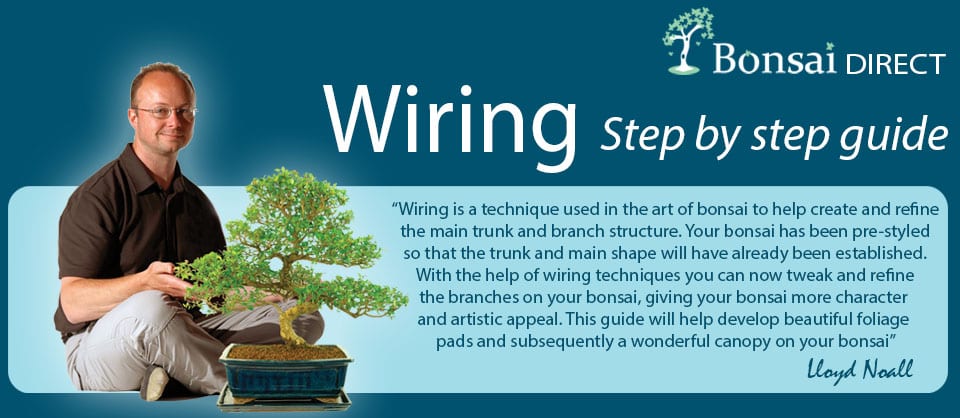
Study your bonsai and identify any branches that need to be re-styled.

Plan your wiring & select the correct wire size and length. Thicker branches will need a thicker wire.
Carefully anchor the centre of the wire around the trunk so that the ends can be continued along the branches.
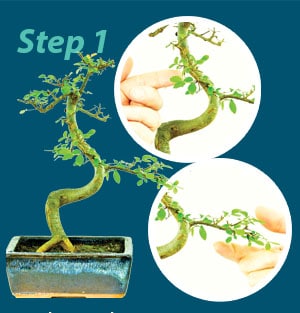
Position the wire along the branch, taking care to place the wire & not tighten. Then trim off the wire ends with the wire cutters.

Holding a branch securely with your fingers, bend the wired branch gently into the desired position.

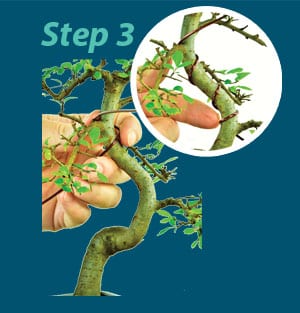
Enhance the character of a branch by adding gentle bends.
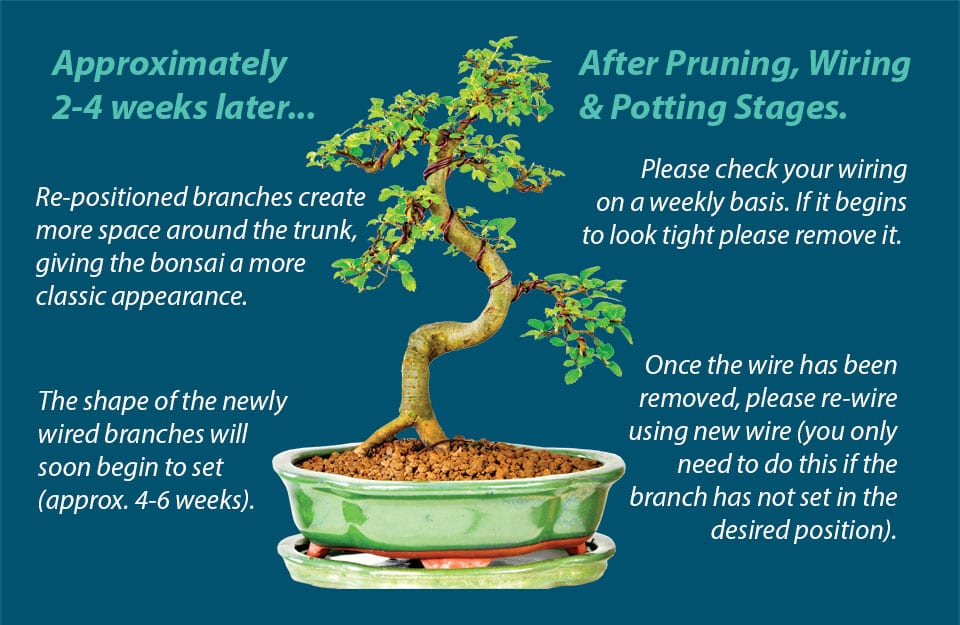
Re-positioned branches create more space around the trunk, giving the bonsai a more classic appearance.
The shape of the newly wired branches will soon begin to set (approx. 4-6 weeks).
Please check your wiring on a weekly basis. If it begins to look tight please remove it.
Once the wire has been removed, please re-wire using new wire (you only need to do this if the branch has not set in the desired position).
Transcription of Bonsai Wiring Tutorial with Lloyd Noall from Bonsai Direct
“So you’ve pruned your bonsai and now you’re keen to get wiring. But first of all, I think what we need to do is just jump back a little bit and just think about why we’re wiring it. What is the purpose of putting wire on the bonsai? Some people actually believe that bonsai is only a bonsai if it’s got loads of wire on it. Well not true. A bonsai is a miniature tree in an ornamental pot. The purpose for wiring it is to tweak it here and there, in my view, it’s not to over bend it and over twist it and make it look a bit odd. It is just to tweak it and what I mean by that is this branch here is nicely pruned, it’s got a nice shape to it now, but I would like to just bring it down a little bit.”
“The branch is sagging, most of the other branches are coming down at that angle. This one’s looks a little bit out of place so I want to change that. Now for me to actually cut that off and regrow it so it’s growing down would take me many years, so wiring is a little bit of a shortcut, and we can do that. The branch is fairly flexible so we can move it a little bit, we can also add a little bit of shape into this branch. What I mean by shape is if you have a look, it is actually quite straight, the trunk has got this nice curve to it, so I want that curve to continue down the branch, and I can use wire to achieve this. I can then have a look around, is there anything else that needs wiring.”
“Originally, they weren’t always wired”
“Well there is a branch at the back here which is also it’s coming down. It’s actually at a nice angle, but it’s a little bit straight, and also I would like to just bring it around a little bit. As we look at it from the front here, I would just like to try and see if I can put a little bit of wire on it and maybe just ease him around so he fills out the space here. So rather than being tucked right behind the tree, he just comes out into this bit of space here. I don’t want to clutter up the inside of this curve too much because I love that, so I have to just be quite subtle about it. I don’t want to bend him too much and of course we can do that throughout.”
“Even some of the smaller twigs can be just altered here and there, tweaked. So rather than cutting everything off and trying to regrow it in the ideal position, which can take many years. In fact, that’s how bonsai were grown originally, they weren’t always wired. It was always the cut and grow method and that produces a fantastic bonsai because that aids the proportions of the bonsai as well. But I think wiring has its place if it’s done properly and that’s what I want to show you how to do. So the first thing is we’re going to need some things to get going with.”
“Quite a lot of difference”
“Obviously you’ve gone through your step by step guide, so you should have a bit of an idea of what’s going on and I think it’s a nice thing just to have there. Oh yes I remember that from watching the video, so it’s a prompt. You will obviously need some wire, so we’ve got a couple of rolls here. It’s got different sizes here, we’ve got a smaller one, slightly thicker one, so smaller branches, smaller wire so on and so on.”
“Wire cutters, what we’ll do is we’ll take those out and have a look at these. These are just for cutting the wire, so they’re not for pruning the branches or anything like that. It might sound a bit silly, but you can see here they’re nice and sharp, very chunky. They’ve got spring loaded handles so they just spring back open again. So when you’re doing a lot of wiring, little things like that make quite a lot of difference.”
“Now that’s one of the tricky things that does come with experience”
“So here we are, we’re going to do some wiring. I’m going to start with this branch and I’ve got to select the right size wire. Now that’s one of the tricky things that does come with experience. I think the smaller one. Let’s just take him out a little bit and what you can do is you can sort of bend it around a little bit, get used to the feel of it and think “well, it’ll probably hold it a little bit, but I don’t think it will do what I need it to do” so I’m going to just go up to the next size, and I think this one will be fine.”
“Obviously you get some really big branches and you can have some really, really big wire. Very difficult to put on, so we’re starting with the easy stuff. Got a little bit of a kink on the end there, I’m just going to cut that off, I like my wire to be nice and straight. What I’m going to do is unwind it a little bit, and I’m going to run it alongside the wire, that branch there, I just want to get an approximate length. We’re not going to cut it off at the same length as the branch, we don’t want the same length because we’re going to be coiling it around. So the wire is going to need to be a little bit longer to allow for that.”
“The wire has to be anchored onto something nice and firm”
“I’m going to allow about that much, it’s always surprising how much more you do need. So I’m going to hold that there. Now in my head I’m thinking “okay, I need that much out there”. I need to anchor this wire to the tree in order for it to hold the branch. The wire has to be anchored onto something nice and firm so we’re going to anchor it onto the trunk here. At the same time, I’m going to look. “Is there any other branches that might need a little bit of a tweak? That one, I think we could put a little bit of shape into that one. This one at the back here, yes we can change that one as well.”
“What I’m going to do is I’m just going to coil around the trunk and come up to my next branch, which is this one here, and then I’m going to come down this branch. I’m going to leave that bit coiled up. Now what I’m trying to do is not break off the branch as I pull the wire around. It’s a little bit tricky getting the first bit started. Now I’m bending the wire with my fingers and my thumb, and I’m putting the curve in into the wire before I actually put it onto the and then I just carefully sort of place it down. So what I’m not doing is I’m not just wiring it, I’m sort of winding it around the tree, because then what happens is the wire tightens up and starts to clamp and cut into the tree, and that just leaves nasty scars.”
“This is just me being a little bit fussy”
“You can take your time, it is fiddly and but it is important to get the wire on nicely. I’m trying not to leave gaps between the wire and the tree, keep it nice and even. Roughly, the wire should be about 45 degree angle to the branch or the trunk. By that you know the sort of angle here coming around now. I’ve got to the other branch, let’s have a look under there. Being very gentle to place the wire on and now we get to this point where there’s lots of little twigs and leaves and things so we’ve got to try and sort of weave it in and out a bit. Can you see that? There. Good. There we go. Have a look under there. Looking good, twig in the way there.”
“We are nearly at the end there now. You can see we’ve come all the way down here. Now it’s at a point where I can cut the wire. Now, what I try to do when I’m trimming the wire off is I cut it in such a way, and this is just me being a little bit fussy, because I always think while the wire is on the tree, it should kind of disappear a little bit. I mean, I know it’s shiny and I know you can see it, but what I like to do is make the wire look like it’s part of the tree. It’s kind of joined in there and it’s one of those silly little things, so I cut the wire off where you can’t see the end of it and that way, psychologically, if we can’t see the end of the wire, it looks like it’s part of the tree. I will trim that one back a little bit.”
“Don’t worry too much”
“From the viewing side, I don’t like to be able to see the end of the wire. That’s me being fussy, that’s up to you. Right, so let’s continue down here, we can take this wire around here now. Let’s get that round there, just carefully carry on forming the wire, mind all the little twigs. A little twist. Now just carefully weave the wire in about. I mean, if you do knock off a little twig or leaf here, it’s not the end of the world, so don’t worry too much. It does happen quite a lot. Now just get that bit of wire, that’s it, easy out there, that’s nice.”
“Now, what I’ll do here is I’ll show you what I mean about the end of the wire showing. So I will cut this one off there and see if I can show you. I don’t know if you can see we’ve got the end of the wire showing there. All right, now I’m going to trim him, trim the wire back underneath. Hopefully you can’t see the end of the wire. Anyway, you’ll see for yourself. So there we are, we’ve got that one wired. Nice and neat. Now we’ll come back around.”
“Don’t force it too much”
“I’m hoping that because this is one of the back is quite a thick branch. I’m not quite sure where the one piece of wire will be enough, we might have to run another one alongside it. This one should be all right though. So what we’ll do is we’ll bring him down a little bit and I’m just going to put my thumb in here, bend him back a little bit a little bit at a time, don’t force it too much because obviously it can snap and it does happen, so just be careful. Then what I’m going to do is I’m just going to put a finger in here and just bend it back the other way a bit, so I’m putting a little kink in. A little bit of a tweak here, and do a bit of a twist, and now we’ve got this nice little twist. Okay, that’s better, a bit more in keeping now.”
“Let’s have a little play with this one at the back here, see if we can just adjust him a little bit. I don’t think he’s going to want to go. No. I think what we’ll have to do is run another wire alongside that one, take him up the trunk and then onto this one here because he’s a little bit straight as well. I’ll go ahead and do that. I think I’ll stick with a thicker wire for now, I’ve got to run my wire alongside the original one, trying to avoid crossing the original one so. Just follow him around that one on there. Now I can just come around the trunk that anchors my wire to the tree.”
“I did it, pulled one off”
“Nicely anchored onto the tree, so it’s not going to wobble around while I’m trying to place it down the trunk. Down the branch, in and out, I’m trying to follow the original wire as closely as I can. I did it, pulled one off. Never mind, tittle twigs, they grow quite quickly, so not too much of a problem. But we don’t want to do obviously, is to break off a main branch, because that takes a few years to grow back, so to be avoided. Right down, and we’re going to snip them off in the same place we did the other one.”
“Now, look around, this branch same process. The problem I have now is that my eyes are getting old and I struggle to focus on it so I have to look through my glasses, over my glasses, under my glasses. I just cut underneath the branch, back around to the viewing side. Okay, now we are going to try and bring this branch just around a little bit. So again, put my thumb in the point where I want to bend it and then just carefully ease it around. Okay. As long as you’ve got something like fingers or thumb to bend it with. Another branch falling off. Of course, once it’s regrown, all the nice new twigs and the foliage pad around the back here, it’s going to look good.”
“I want him to shoot out to the side”
“So this one here, a little tweak. I just want to bring him a little bit around to the front. I’m going to bend him from here, a little curve so it just suddenly, suddenly creeps out to the foreground. If I can get my fingers in there without knocking off another twig. How does that look? Let’s spin it around so I can have a look. Good. Now it’s creeping down a little bit too much there so you see the gap here. I’m just going to bring him up a little bit and actually I can bend him sort of halfway down just to give him a little bit of a curve, bit of a sweep up there.”
“This one here is sticking up this little twig here, so I’m going to prune him down a little bit. I should get some scissors. And here we are. I want him to shoot out to the side, so there’s one that I missed on the pruning in the last video. Now I’ve got a bit more shape. Okay, so this first branch down here, he’s got a nice shape coming to him now. Curving a little bit there. this one here we’ve tweaked, brought him around so that we can see him from the viewing side. We know he’s a back branch so the back branch gives us some depth.”
“Poke you in the eye branches”
“We want to try and avoid branches, what we call poke you in the eye branches. Branches that are coming straight out to the front like that, we call the poke you in the eye branch because as you go forward to have a look at the tree, it pokes you in the eye. Nice, clear view from the front there, branches spread out nicely, little curves, tweaks changing direction here. Beautiful, and of course a lot of these little ones.”
“I said earlier, we can tweak some of these little twigs as well and that’s what the smaller wires for. If you want to have a little play with those, great. The important thing now is when you’ve finished your wiring is to check it every week. It’s always surprising how fast trees do actually grow and what will happen is the trunk and the branches will start to swell up a little bit, and will try to grow around the and if you don’t take the wire off, you’ll end up with a scar.”
“Check it every week”
“You can end up in bad circumstances where you’ve got this scarring which obviously follows the wire and it’s twisted all the way around, so try to avoid that, and the best way to avoid that is to check it every week. As soon as it starts to look a little bit tight so you can’t see the underside of the wire because the bark is starting to grow around it, it’s time to get your snippers out.
“Then just very carefully on each little run like that, just go along and snip all the wire off and then hopefully the branch is set. Probably take on this on this type of tree about 4 to 6 weeks. Take all the wire off, if it does move back, put it on, but try to put it on in a different position to the original wire. So there we go, it’s all wired now. All right, spin it around so you can have a look all the way around. It does look better.”
10 days later..
“Here we are, back again only ten days later. Look, it’s beautiful, isn’t it? Look at all these lovely green leaves. New shoots in abundance. In fact, needs pruning. Gosh. Amazing. I do love it. It is fantastic. And remember, don’t forget to check the wiring.”


0 replies